Essential Raspberry Pi Components
1. Raspberry Pi Board
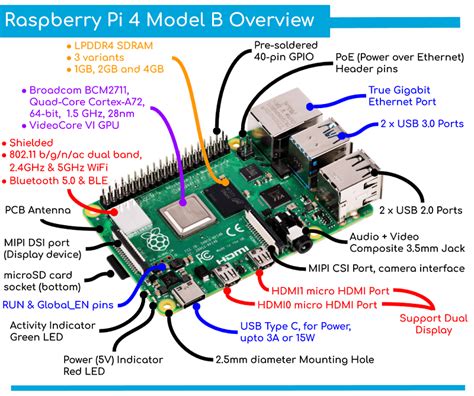
The heart of your project is the Raspberry Pi board itself. There are several models available, each with different specifications and capabilities. Here’s a table comparing the popular Raspberry Pi models:
| Model | Processor | RAM | USB Ports | Ethernet | Wireless | GPIO Pins |
|---|---|---|---|---|---|---|
| Raspberry Pi 4B | Broadcom BCM2711 | 2GB/4GB/8GB | 2 USB 3.0, 2 USB 2.0 | Gigabit | 802.11ac Wi-Fi, Bluetooth 5.0 | 40 |
| Raspberry Pi 3B+ | Broadcom BCM2837B0 | 1GB | 4 USB 2.0 | Gigabit | 802.11ac Wi-Fi, Bluetooth 4.2 | 40 |
| Raspberry Pi Zero W | Broadcom BCM2835 | 512MB | 1 Micro USB | No | 802.11n Wi-Fi, Bluetooth 4.1 | 40 |
Choose the model that best suits your project requirements and budget.
2. Power Supply
To power your Raspberry Pi, you’ll need a reliable power supply. The recommended power supply varies depending on the Raspberry Pi model you choose. Here are the recommended power supplies for popular models:
- Raspberry Pi 4B: 5V/3A USB-C power supply
- Raspberry Pi 3B+: 5V/2.5A micro USB power supply
- Raspberry Pi Zero W: 5V/1A micro USB power supply
Ensure that you use a high-quality power supply to avoid power-related issues and ensure stable performance.
3. microSD Card
The Raspberry Pi uses a microSD card as its primary storage device. The microSD card holds the operating system and all your files. When choosing a microSD card, consider the following factors:
- Capacity: Depending on your project needs, choose a microSD card with sufficient storage capacity. A minimum of 8GB is recommended, but 16GB or 32GB cards are common choices.
- Speed Class: Opt for a microSD card with a high speed class to ensure optimal performance. Class 10 or UHS-I cards are recommended for the Raspberry Pi.
4. HDMI Cable
To connect your Raspberry Pi to a display, you’ll need an HDMI cable. The Raspberry Pi 4B features two micro HDMI ports, while earlier models have a single full-size HDMI port. Make sure you have the appropriate HDMI cable for your Raspberry Pi model and display.
5. Keyboard and Mouse
To interact with your Raspberry Pi, you’ll need a keyboard and mouse. You can use a standard USB keyboard and mouse or opt for a wireless keyboard and mouse combo for a clutter-free setup.
6. Case (Optional)
While not essential, a case for your Raspberry Pi can provide protection and improve the aesthetics of your project. There are various case options available, ranging from simple plastic enclosures to customizable cases with cooling features.
Additional Components for Specific Projects
Depending on your project requirements, you may need additional components. Here are a few common components used in Raspberry Pi Projects:
1. Camera Module
The Raspberry Pi Camera Module allows you to capture images and record videos. It connects directly to the Raspberry Pi’s camera serial interface (CSI) port. There are two versions available: the standard Camera Module and the NoIR Camera Module (without an infrared filter).
2. Breadboard and Jumper Wires
For electronics projects, a breadboard and jumper wires are essential. A breadboard allows you to create temporary circuits without soldering, while jumper wires are used to make connections between components on the breadboard and the Raspberry Pi’s GPIO pins.
3. Sensors
Sensors are used to gather data from the environment or detect specific conditions. Some commonly used sensors with the Raspberry Pi include:
- Temperature and humidity sensors (e.g., DHT11, DHT22)
- Motion sensors (e.g., PIR sensor)
- Light Sensors (e.g., LDR, photodiode)
- Ultrasonic Distance Sensors (e.g., HC-SR04)
Choose sensors based on the data you want to collect or the conditions you want to monitor.
4. LEDs and Displays
LEDs and displays are often used for visual output in Raspberry Pi projects. LEDs can be used for status indication, while displays like LCD or OLED screens can show text or graphics. Some popular choices include:
- LED lights
- 16×2 LCD display
- OLED display (e.g., SSD1306)
5. Motors and Servos
For projects involving movement or actuation, motors and servos are commonly used. DC motors can be controlled using motor driver modules like the L298N, while servos can be directly connected to the Raspberry Pi’s GPIO pins and controlled using Pulse-Width Modulation (PWM).

Getting Started with Raspberry Pi
Once you have gathered the necessary components, follow these steps to get started with your Raspberry Pi:
- Download the Raspberry Pi operating system (e.g., Raspberry Pi OS) from the official website.
- Write the operating system image to your microSD card using a tool like Etcher.
- Insert the microSD card into your Raspberry Pi.
- Connect the HDMI cable, keyboard, mouse, and power supply.
- Power on your Raspberry Pi and follow the initial setup wizard.
With your Raspberry Pi set up, you can start exploring various projects and tutorials available online. The Raspberry Pi community is vast and supportive, offering a wealth of resources and inspiration for beginners and experienced makers alike.

Frequently Asked Questions (FAQ)
-
Can I use any power supply with my Raspberry Pi?
It’s recommended to use the official Raspberry Pi power supply or a high-quality third-party power supply that meets the specific requirements of your Raspberry Pi model. Using an insufficient or poorly regulated power supply can lead to stability issues or even damage your Raspberry Pi. -
Do I need a case for my Raspberry Pi?
While a case is not strictly necessary, it is highly recommended. A case provides protection for your Raspberry Pi against dust, dirt, and accidental damage. It also helps with heat dissipation and can improve the overall appearance of your project. -
Can I use a Raspberry Pi without a display?
Yes, you can use a Raspberry Pi without a display by connecting to it remotely using SSH (Secure Shell) or VNC (Virtual Network Computing). This allows you to access your Raspberry Pi’s command line or desktop environment from another computer on the same network. -
What programming languages can I use with the Raspberry Pi?
The Raspberry Pi supports a wide range of programming languages, including Python, C/C++, Java, JavaScript (Node.js), and more. Python is particularly popular among Raspberry Pi users due to its simplicity and extensive library support for hardware interaction. -
Can I connect multiple sensors or components to the Raspberry Pi?
Yes, the Raspberry Pi has a 40-pin GPIO (General Purpose Input/Output) header that allows you to connect multiple sensors, LEDs, buttons, and other components. However, keep in mind that each GPIO pin has specific functions and limitations, so refer to the Raspberry Pi’s pin layout and documentation when connecting components.

Conclusion
The Raspberry Pi is an incredibly versatile and powerful single-board computer that opens up a world of possibilities for DIY Projects and learning. By having the essential Raspberry Pi components, such as the board itself, power supply, microSD card, HDMI cable, and input devices, you can start exploring the vast ecosystem of Raspberry Pi projects. Remember to choose additional components based on your specific project requirements and consult the extensive online resources and community forums for guidance and inspiration. Happy making with your Raspberry Pi!
No responses yet