Introduction to Prototyping Boards
A prototyping board, also known as a breadboard, is an essential tool for anyone involved in electronics projects, whether you are a hobbyist, student, or professional engineer. It provides a quick and easy way to build and test electronic circuits without the need for soldering. In this article, we will explore the unique features and benefits of prototyping boards, their different types, and how to use them effectively in your projects.
What is a Prototyping Board?
A prototyping board is a reusable platform that allows you to create temporary electronic circuits by plugging in various components such as resistors, capacitors, transistors, and integrated circuits (ICs). The board consists of a grid of holes, each connected to a metal strip underneath. These metal strips form a network of electrical connections, enabling you to build circuits by simply inserting component leads into the appropriate holes.
Key Features of Prototyping Boards
-
Reusability: Prototyping boards are designed for temporary use, allowing you to easily modify or disassemble your circuits without damaging the components or the board itself.
-
Solderless: Unlike PCBs (printed circuit boards), prototyping boards do not require soldering. This makes them ideal for quick prototyping and experimenting with different circuit designs.
-
Modularity: The grid-like layout of a prototyping board enables you to organize your components in a modular fashion, making it easier to understand and debug your circuits.
-
Compatibility: Prototyping boards are compatible with a wide range of electronic components, from basic discrete components to complex ICs and modules.

Types of Prototyping Boards
There are several types of prototyping boards available, each with its own unique features and advantages. Let’s take a closer look at some of the most common types:
Solderless Breadboard
A solderless breadboard is the most popular type of prototyping board. It consists of a plastic base with a grid of holes and metal strips underneath. The holes are typically arranged in two main sections: the terminal strips and the distribution strips.
| Section | Description |
|---|---|
| Terminal Strips | These are the outer rows of holes, usually labeled with numbers or letters. They are used for connecting power supply and other common signals to your circuit. |
| Distribution Strips | These are the inner rows of holes, divided into smaller groups. They are used for connecting components and building your circuit. |
Solderless breadboards come in various sizes, ranging from small boards with a few hundred holes to large boards with several thousand holes.
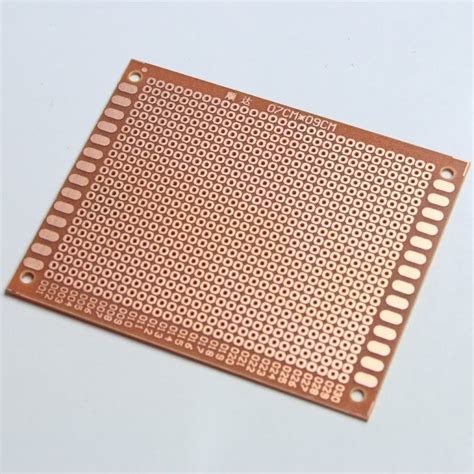
Perfboard
A perfboard, also known as a protoboard or DOT PCB, is a type of prototyping board that resembles a printed circuit board (PCB). It consists of a rigid substrate, typically made of fiberglass or phenolic material, with a grid of pre-drilled holes. Unlike solderless breadboards, perfboards require soldering to create permanent connections between components.
Perfboards offer several advantages over solderless breadboards:
-
Durability: Soldered connections on a perfboard are more robust and durable than the temporary connections on a solderless breadboard.
-
Customization: You can easily customize a perfboard by cutting it to size or drilling additional holes to accommodate specific components or layouts.
-
Compact Size: Perfboards allow for more compact circuit designs compared to solderless breadboards, as you can place components closer together and use both sides of the board.
Stripboard
A stripboard, also known as a veroboard, is a type of prototyping board that combines features of both solderless breadboards and perfboards. It consists of a rigid substrate with parallel copper strips running along one side of the board. The copper strips are pre-drilled with holes at regular intervals, allowing you to solder components to create your circuit.
To break the connection between adjacent holes on a stripboard, you can use a spot face cutter or a drill bit to remove a small section of the copper strip. This enables you to create custom circuit layouts and isolate specific sections of your circuit.
Stripboards offer a balance between the flexibility of solderless breadboards and the durability of perfboards. They are particularly useful for projects that require a more permanent solution than a breadboard but do not warrant the complexity of a Custom PCB.

How to Use a Prototyping Board
Using a prototyping board is relatively straightforward, but there are some best practices and tips to keep in mind to ensure a successful project.
Planning Your Circuit
Before starting to build your circuit on a prototyping board, it is essential to plan your layout carefully. This involves the following steps:
-
Schematic Design: Create a schematic diagram of your circuit using a software tool or by hand. This will help you visualize the connections between components and ensure that your circuit is logically correct.
-
Component Selection: Choose the appropriate components for your circuit based on their specifications and the requirements of your project. Make sure to consider factors such as voltage ratings, current ratings, and package sizes.
-
Board Layout: Sketch out the physical layout of your components on the prototyping board. Consider the placement of power supply connections, ground connections, and signal paths to minimize interference and ensure proper functionality.
Building Your Circuit
Once you have planned your circuit, you can start building it on the prototyping board. Follow these steps:
-
Insert Components: Place your components on the prototyping board, ensuring that their leads are properly aligned with the holes. For solderless breadboards, simply push the leads into the appropriate holes. For perfboards and stripboards, you may need to bend the leads slightly to fit them through the holes.
-
Make Connections: Use jumper wires or component leads to create the necessary connections between components. On solderless breadboards, you can use the metal strips to connect components in the same row. For perfboards and stripboards, you will need to solder the connections using a soldering iron and solder.
-
Test and Debug: Once your circuit is built, carefully inspect all connections to ensure they are secure and free of shorts. Power on your circuit and test its functionality using a multimeter or oscilloscope. If you encounter any issues, use the schematic diagram to systematically troubleshoot and debug your circuit.
Best Practices
To get the most out of your prototyping board and ensure reliable results, consider the following best practices:
-
Keep Wires Short: Use the shortest possible jumper wires or component leads to minimize resistance and Stray Capacitance, which can affect circuit performance.
-
Use Color Coding: Color-code your jumper wires to make it easier to identify different signal paths and power connections. This will also help you debug your circuit more efficiently.
-
Avoid Overcrowding: Leave sufficient space between components to avoid accidental short circuits and to make it easier to modify or debug your circuit.
-
Use Sockets for ICs: When working with integrated circuits (ICs), consider using IC sockets instead of soldering the ICs directly to the board. This allows for easy replacement and protects the ICs from potential damage during soldering.
-
Document Your Work: Keep a record of your circuit schematic, component values, and any modifications made during the prototyping process. This documentation will be valuable for future reference and troubleshooting.

Frequently Asked Questions (FAQ)
-
What is the difference between a solderless breadboard and a perfboard?
A solderless breadboard allows for temporary connections without soldering, while a perfboard requires soldering to create permanent connections between components. -
Can I reuse a prototyping board for multiple projects?
Yes, prototyping boards are designed to be reusable. Solderless breadboards can be easily reused by removing the components and starting a new project. Perfboards and stripboards can be reused if the previous components are desoldered carefully. -
How do I choose the right size prototyping board for my project?
The size of the prototyping board depends on the complexity of your circuit and the number of components involved. Start with a board that has more holes than you think you’ll need to allow for flexibility and future expansions. -
Can I use a prototyping board for high-frequency circuits?
Prototyping boards are not ideal for high-frequency circuits due to the inherent capacitance and inductance of the metal strips and jumper wires. For high-frequency applications, it is better to use a custom PCB designed with proper signal integrity considerations. -
What tools do I need to work with prototyping boards?
The essential tools for working with prototyping boards include jumper wires, wire strippers, pliers, a soldering iron (for perfboards and stripboards), solder, and a multimeter for testing and debugging. A logic analyzer or oscilloscope can also be helpful for more advanced projects.
Conclusion
Prototyping boards are invaluable tools for anyone working on electronics projects. They provide a flexible and reusable platform for building and testing circuits, enabling faster iteration and experimentation. By understanding the different types of prototyping boards and following best practices for their use, you can create reliable and efficient prototypes that bring your ideas to life.
Whether you are a beginner learning the basics of electronics or an experienced engineer working on complex systems, prototyping boards are an essential part of your toolkit. With the knowledge gained from this article, you can confidently choose the right prototyping board for your needs and start building your next amazing project.
No responses yet