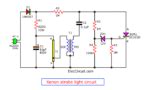
Introduction to Xenon Flash Circuits
A xenon flash circuit is an electronic device that produces a bright, intense burst of light using a xenon flash tube. These circuits are commonly used in photography, strobe lights, and other applications requiring a powerful, short-duration light source. In this article, we will explore the components, working principle, and step-by-step instructions for building a xenon flash circuit.
What is a Xenon Flash Tube?
A xenon flash tube is a gas-filled tube that contains two electrodes and is filled with xenon gas. When a high voltage is applied across the electrodes, the xenon gas ionizes and conducts electricity, creating a bright flash of light. Xenon flash tubes are known for their ability to produce a high-intensity, short-duration light output, making them ideal for various applications.
Applications of Xenon Flash Circuits
Xenon flash circuits find applications in several fields, including:
- Photography: Used in camera flashes and studio lighting equipment.
- Strobe lights: Employed in entertainment and visual effects industries.
- Scientific instrumentation: Utilized in spectroscopy and other analytical techniques.
- Security systems: Incorporated into intrusion detection and alarm systems.
Components Required for a Xenon Flash Circuit
To build a xenon flash circuit, you will need the following components:
| Component | Description |
|---|---|
| Xenon Flash Tube | The main light-producing element in the circuit. |
| High Voltage Power Supply | Provides the necessary high voltage to trigger the xenon flash tube. |
| Capacitor | Stores the energy required for the flash. |
| Trigger Transformer | Generates the high voltage pulse to initiate the flash. |
| Resistors | Used for current limiting and voltage division. |
| Diodes | Provide protection and rectification in the circuit. |
| Thyristor (SCR or TRIAC) | Controls the discharge of the capacitor into the xenon flash tube. |
| PCB or Breadboard | Used for assembling the circuit components. |
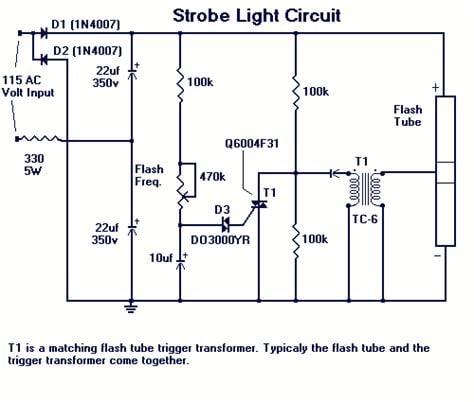
Working Principle of a Xenon Flash Circuit
The working principle of a xenon flash circuit can be summarized in the following steps:
- The high voltage power supply charges the capacitor to a high voltage, typically several hundred volts.
- When a trigger signal is applied to the thyristor, it becomes conductive and allows the capacitor to discharge rapidly through the primary winding of the trigger transformer.
- The sudden discharge of the capacitor induces a high voltage pulse in the secondary winding of the trigger transformer.
- This high voltage pulse is applied to the trigger electrode of the xenon flash tube, ionizing the xenon gas inside the tube.
- As the xenon gas ionizes, it becomes conductive, allowing the capacitor to discharge through the tube, creating a bright flash of light.
- Once the capacitor is discharged, the xenon gas deionizes, and the cycle can be repeated.

Step-by-Step Guide to Building a Xenon Flash Circuit
Step 1: Gather the Required Components
Ensure that you have all the necessary components listed in the “Components Required” section before starting the assembly process.
Step 2: Design the Circuit Schematic
Create a circuit schematic based on the working principle described above. You can use Circuit design software or draw the schematic by hand.
Step 3: Assemble the High Voltage Power Supply
Build the high voltage power supply using a step-up transformer, rectifier diodes, and filter capacitors. Ensure proper insulation and safety precautions when working with high voltages.
Step 4: Connect the Capacitor and Thyristor
Connect the high voltage capacitor in parallel with the xenon flash tube. Place the thyristor in series with the primary winding of the trigger transformer.
Step 5: Implement the Trigger Circuit
Design and implement the trigger circuit that will control the firing of the thyristor. This can be done using a microcontroller, a timer IC, or a manual switch, depending on your application requirements.
Step 6: Wire the Xenon Flash Tube
Carefully connect the xenon flash tube to the circuit, ensuring proper polarity and secure connections. Use insulated wires and connectors rated for high voltages.
Step 7: Test and Troubleshoot
Power on the circuit and test its functionality. If the flash tube does not fire, troubleshoot the circuit by checking the connections, component values, and trigger signal.

Safety Precautions
When working with xenon flash circuits, it is crucial to follow safety precautions due to the high voltages involved:
- Always disconnect the power supply before making any changes to the circuit.
- Use insulated tools and wear protective gear, such as gloves and safety glasses.
- Ensure proper grounding of the circuit and the work area.
- Keep flammable materials away from the xenon flash tube, as it can generate significant heat during operation.
- Do not look directly at the xenon flash tube when it is triggered, as the intense light can cause eye damage.
Troubleshooting Common Issues
- Flash tube does not fire: Check the trigger circuit, thyristor connections, and ensure the capacitor is charged to the required voltage.
- Weak or inconsistent flash output: Verify the capacitor value and ensure it is fully charged before each flash. Check the power supply voltage and the condition of the xenon flash tube.
- Premature flash tube failure: Ensure the capacitor voltage and discharge current are within the flash tube’s specifications. Avoid excessive flash repetition rates that can overheat the tube.
Frequently Asked Questions (FAQ)
- What is the typical voltage required to trigger a xenon flash tube?
-
Xenon flash tubes typically require a trigger voltage of several kilovolts (kV) to ionize the xenon gas and initiate the flash. The exact voltage depends on the specific flash tube and its specifications.
-
Can I use a regular power supply instead of a high voltage power supply?
-
No, a regular power supply cannot provide the high voltage necessary to charge the capacitor and trigger the xenon flash tube. A dedicated high voltage power supply is required for proper operation of the xenon flash circuit.
-
How long does a xenon flash tube last?
-
The lifespan of a xenon flash tube depends on factors such as the operating voltage, flash repetition rate, and cooling. Typically, xenon flash tubes can last for several thousand flashes before requiring replacement.
-
What is the purpose of the trigger transformer in the circuit?
-
The trigger transformer is used to generate the high voltage pulse required to ionize the xenon gas in the flash tube. It steps up the voltage from the capacitor discharge to the level needed for triggering the flash.
-
Can I adjust the duration or intensity of the flash output?
- The flash duration is primarily determined by the capacitor value and the characteristics of the xenon flash tube. Adjusting the capacitor value or the voltage can influence the flash intensity. However, modifying these parameters should be done carefully to avoid exceeding the flash tube’s ratings.
Conclusion
Building a xenon flash circuit requires a good understanding of electronic components, high voltage safety, and the working principle of xenon flash tubes. By following the step-by-step guide provided in this article and adhering to the safety precautions, you can successfully construct your own xenon flash circuit for various applications. Remember to troubleshoot any issues methodically and always prioritize safety when working with high voltages.
No responses yet