Introduction to LogiSwitch Workbench
LogiSwitch Workbench is a revolutionary tool designed to streamline the process of designing, simulating, and implementing logic circuits. This powerful software package offers a user-friendly interface that allows engineers, students, and hobbyists to create complex digital systems with ease. The LogiSwitch Workbench News is your go-to source for the latest updates, tutorials, and insights related to this innovative tool.
Key Features of LogiSwitch Workbench
- Intuitive drag-and-drop interface
- Extensive library of pre-built components
- Real-time simulation and debugging
- Integration with popular hardware platforms
- Collaborative design features for team projects
Getting Started with LogiSwitch Workbench
System Requirements
Before installing LogiSwitch Workbench, ensure that your computer meets the following minimum system requirements:
| Operating System | Processor | RAM | Storage |
|---|---|---|---|
| Windows 10/11 | Intel Core i5 or equivalent | 8 GB | 500 MB |
| macOS 10.15+ | Intel Core i5 or equivalent | 8 GB | 500 MB |
| Linux (Ubuntu 20.04+) | Intel Core i5 or equivalent | 8 GB | 500 MB |
Installation Process
To install LogiSwitch Workbench, follow these simple steps:
- Download the appropriate installer for your operating system from the official LogiSwitch website.
- Double-click the installer file and follow the on-screen instructions.
- Accept the license agreement and choose the installation directory.
- Wait for the installation process to complete.
- Launch LogiSwitch Workbench from your desktop or applications menu.
Creating Your First Project
Once you have installed LogiSwitch Workbench, you can start creating your first project:
- Launch LogiSwitch Workbench and click on “New Project.”
- Choose a project template or select “Blank Project” to start from scratch.
- Give your project a name and choose a location to save it.
- Click “Create” to open the main workspace.

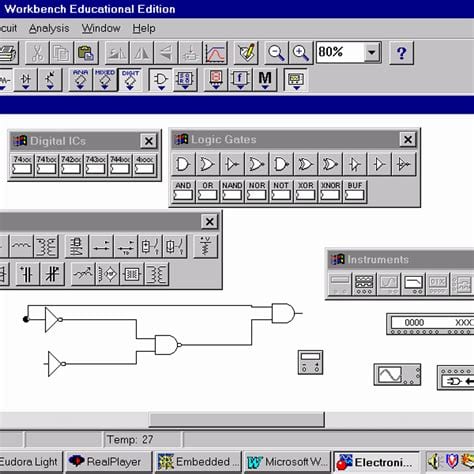
Designing Logic Circuits with LogiSwitch Workbench
The Main Workspace
The LogiSwitch Workbench main workspace is divided into several key areas:
- Toolbar: Contains essential tools for designing, simulating, and debugging your circuits.
- Component Library: Provides access to a wide range of pre-built components, such as gates, flip-flops, and multiplexers.
- Design Area: The central area where you create and manipulate your logic circuits.
- Properties Panel: Displays and allows you to modify the properties of selected components.
- Simulation Panel: Shows the real-time behavior of your circuit during simulation.
Adding Components to Your Design
To add components to your logic circuit:
- Open the Component Library by clicking on the “Library” tab in the left sidebar.
- Browse through the available categories or use the search bar to find specific components.
- Drag and drop the desired component from the library onto the Design Area.
- Repeat the process to add more components as needed.
Connecting Components
To create connections between components:
- Click on the output port of the source component.
- Drag the mouse cursor to the input port of the destination component.
- Release the mouse button to create the connection.
- Repeat the process to create additional connections.
Modifying Component Properties
To modify the properties of a component:
- Select the component in the Design Area by clicking on it.
- Open the Properties Panel by clicking on the “Properties” tab in the right sidebar.
- Adjust the desired properties, such as the component’s name, input/output settings, or delay values.
- Click “Apply” to save the changes.

Simulating and Debugging Logic Circuits
Running a Simulation
To simulate your logic circuit:
- Ensure that your circuit is complete and free of errors.
- Click on the “Simulate” button in the toolbar or select “Simulate” from the “Run” menu.
- Set the desired simulation parameters, such as the duration and time step.
- Click “Start” to begin the simulation.
Analyzing Simulation Results
During the simulation, the Simulation Panel will display the real-time behavior of your circuit:
- The Simulation Panel shows the waveforms for each input and output signal in your circuit.
- Use the zoom and pan tools to navigate through the waveforms and analyze specific areas of interest.
- Click on a specific time point to view the state of your circuit at that moment.
Debugging Your Circuit
If your circuit is not behaving as expected, you can use LogiSwitch Workbench’s debugging features to identify and fix issues:
- Click on the “Debug” button in the toolbar or select “Debug” from the “Run” menu.
- Set breakpoints in your circuit by clicking on the desired components or connections.
- Step through your circuit’s operation using the “Step Over” and “Step Into” buttons.
- Use the “Watches” panel to monitor the values of specific signals or variables.
Advanced Features of LogiSwitch Workbench
Hierarchical Design
LogiSwitch Workbench supports hierarchical design, allowing you to create complex circuits by combining smaller sub-circuits:
- Create a new sub-circuit by selecting “New Sub-Circuit” from the “File” menu.
- Design the sub-circuit using the same process as for the main circuit.
- Save the sub-circuit and add it to your main circuit by dragging it from the Component Library.
Hardware Integration
LogiSwitch Workbench can integrate with popular hardware platforms, such as Arduino and Raspberry Pi:
- Connect your hardware device to your computer using a USB cable.
- Select “Hardware” from the “Tools” menu and choose your device from the list.
- Configure the communication settings, such as the port and baud rate.
- Upload your circuit to the hardware device by clicking the “Upload” button in the toolbar.
Collaboration Features
LogiSwitch Workbench includes collaboration features that enable teams to work together on complex projects:
- Share your project with team members by selecting “Share” from the “File” menu.
- Set access permissions for each team member, such as view-only or edit access.
- Use the built-in chat and commenting features to communicate with your team and discuss design decisions.
- Track changes made by each team member using the version history feature.
Frequently Asked Questions (FAQ)
1. Is LogiSwitch Workbench available for free?
LogiSwitch Workbench offers a free trial version with limited features. To access the full range of features, you will need to purchase a license.
2. Can I use LogiSwitch Workbench for commercial projects?
Yes, LogiSwitch Workbench can be used for both personal and commercial projects. However, commercial use requires a specific license. Please refer to the LogiSwitch website for more information on licensing options.
3. Does LogiSwitch Workbench support VHDL or Verilog?
Currently, LogiSwitch Workbench does not support VHDL or Verilog. It uses its own proprietary language for designing and simulating logic circuits.
4. Can I import designs from other software into LogiSwitch Workbench?
LogiSwitch Workbench supports importing designs from a limited number of third-party software packages. Please refer to the documentation for a list of supported software and import instructions.
5. How can I get support if I encounter issues with LogiSwitch Workbench?
LogiSwitch offers several support options, including an online knowledge base, email support, and a community forum. For more information on support resources, please visit the LogiSwitch website.
Conclusion
LogiSwitch Workbench is a powerful and user-friendly tool that simplifies the process of designing, simulating, and implementing logic circuits. With its intuitive interface, extensive component library, and advanced features, LogiSwitch Workbench is an essential tool for engineers, students, and hobbyists alike. By staying up-to-date with the LogiSwitch Workbench News, you can ensure that you are making the most of this innovative software package and staying ahead of the curve in the world of digital design.
No responses yet