
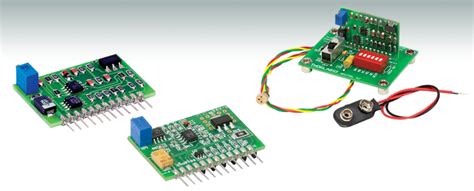
Introduction to Laser Diode Drivers in Lidar Systems
Lidar (Light Detection and Ranging) systems have become increasingly important in various applications, such as autonomous vehicles, robotics, and surveying. At the heart of these systems lies the laser diode driver, a critical component responsible for generating high-power, short-duration laser pulses. The performance of the laser diode driver directly impacts the accuracy, range, and resolution of the lidar system. In this article, we will delve into the intricacies of pulsed laser diode driver circuit layout for lidar applications, exploring key design considerations, circuit topologies, and best practices to optimize performance and reliability.
The Role of Laser Diode Drivers in Lidar
Laser diode drivers play a crucial role in lidar systems by controlling the current and timing of the laser diode, which emits the light pulses used for distance measurement. The driver circuit must be capable of delivering high-current pulses with fast rise and fall times to generate narrow, high-power laser pulses. These pulses are then directed towards the target, and the reflected light is captured by a photodetector. By measuring the time-of-flight of the laser pulses, the lidar system can determine the distance to the target with high precision.
Key Requirements for Laser Diode Drivers in Lidar
To ensure optimal performance in lidar applications, laser diode drivers must meet several key requirements:
-
High peak current: The driver must be capable of delivering high peak currents to the laser diode, typically in the range of several amperes, to generate high-power laser pulses.
-
Fast rise and fall times: The driver should have fast rise and fall times, typically in the nanosecond range, to produce narrow laser pulses with minimal pulse width distortion.
-
Pulse width control: The driver must allow precise control over the pulse width, enabling the lidar system to adapt to different operating conditions and target characteristics.
-
Low jitter: The driver should exhibit low timing jitter to maintain the accuracy and precision of the time-of-flight measurements.
-
High efficiency: To minimize power consumption and heat generation, the driver circuit should operate with high efficiency, especially in battery-powered lidar systems.
-
Robustness and reliability: The driver must be robust and reliable, capable of operating under various environmental conditions and withstanding the stresses associated with high-current pulses.
Laser Diode Driver Circuit Topologies
Several circuit topologies can be employed for pulsed laser diode drivers, each with its own advantages and trade-offs. In this section, we will explore three commonly used topologies: the current mirror driver, the switching regulator driver, and the capacitor discharge driver.
Current Mirror Driver
The current mirror driver topology is a simple and widely used approach for laser diode drivers. It consists of a current source, typically implemented using a transistor, which mirrors the current flowing through a reference resistor. The laser diode is connected in series with the current source, and the current through the diode is controlled by adjusting the reference current.
Advantages:
– Simple and straightforward design
– Low component count
– Easy to implement and debug
Disadvantages:
– Limited peak current capability due to the transistor’s current handling limitations
– Slower rise and fall times compared to other topologies
– Higher power dissipation in the current source transistor
Switching Regulator Driver
The switching regulator driver topology utilizes a switch-mode power supply (SMPS) to generate the high-current pulses for the laser diode. The SMPS typically consists of a switch (e.g., MOSFET), an inductor, a diode, and a capacitor. By rapidly turning the switch on and off, the inductor stores and releases energy, generating high-current pulses to drive the laser diode.
Advantages:
– High peak current capability, limited only by the switch and inductor ratings
– Fast rise and fall times due to the rapid switching action
– High efficiency, as the switch operates in either fully on or fully off states
– Pulse width control through duty cycle adjustment
Disadvantages:
– More complex design compared to the current mirror topology
– Higher component count and cost
– Potential for electromagnetic interference (EMI) due to high-frequency switching
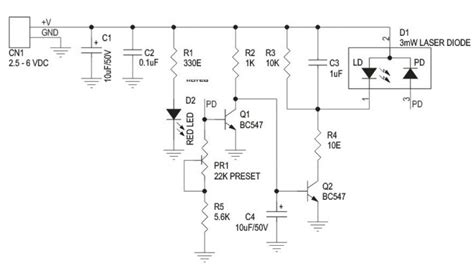
Capacitor Discharge Driver
The capacitor discharge driver topology relies on the rapid discharge of a charged capacitor to generate high-current pulses for the laser diode. The capacitor is charged to a high voltage using a separate charging circuit and then rapidly discharged through the laser diode using a high-speed switch, such as a MOSFET or an avalanche transistor.
Advantages:
– Very high peak current capability, limited only by the capacitor and switch ratings
– Extremely fast rise times, as the capacitor can discharge rapidly
– Simple and compact design, especially for low-repetition-rate applications
Disadvantages:
– Limited pulse width control, as the pulse duration is determined by the capacitor discharge time
– Lower efficiency compared to the switching regulator topology
– Requires a separate charging circuit for the capacitor
Circuit Design Considerations
When designing a pulsed laser diode driver circuit for lidar applications, several key considerations must be taken into account to ensure optimal performance, reliability, and safety.
Laser Diode Characteristics
The laser diode is the central component of the driver circuit, and its characteristics must be carefully considered during the design process. Important parameters include:
- Forward voltage drop: The driver circuit must provide sufficient voltage to overcome the laser diode’s forward voltage drop and maintain the desired current level.
- Maximum peak current: The driver must not exceed the laser diode’s maximum peak current rating to prevent damage and ensure reliable operation.
- Pulse width limitations: Some laser diodes may have limitations on the minimum and maximum pulse widths they can support, which must be taken into account when designing the driver circuit.
Power Supply Requirements
The power supply for the laser diode driver must be carefully designed to ensure stable and reliable operation. Key considerations include:
- Voltage and current ratings: The power supply must provide sufficient voltage and current to support the driver circuit’s requirements, taking into account the laser diode’s forward voltage drop and the desired peak current.
- Noise and ripple: The power supply should have low noise and ripple to minimize jitter and ensure stable laser output.
- Transient response: The power supply must have a fast transient response to accommodate the rapid changes in current demand during pulsing.
Thermal Management
Pulsed laser diode drivers can generate significant amounts of heat, especially when operating at high currents and duty cycles. Proper thermal management is essential to ensure reliable operation and prevent damage to the laser diode and other components. Considerations include:
- Heatsinking: The laser diode and driver circuit components must be adequately heatsunk to dissipate the generated heat efficiently.
- Airflow: In some cases, forced airflow may be necessary to provide sufficient cooling, especially in high-power or high-duty-cycle applications.
- Thermal monitoring: Incorporating temperature sensors and monitoring circuits can help detect and prevent thermal overload conditions.
Electromagnetic Compatibility (EMC)
Pulsed laser diode drivers can be a source of electromagnetic interference (EMI) due to the high-current, fast-switching nature of their operation. Proper EMC design practices must be followed to minimize interference and ensure compliance with relevant standards. Considerations include:
- Shielding: Adequate shielding of the driver circuit and laser diode can help contain EMI and prevent interference with other systems.
- Grounding and filtering: Proper grounding and filtering techniques can help reduce EMI and improve signal integrity.
- Layout and routing: Careful layout and routing of the driver circuit can minimize loop areas and reduce the coupling of high-frequency noise.

Circuit Layout Best Practices
Proper circuit layout is crucial for achieving optimal performance and reliability in pulsed laser diode driver circuits. In this section, we will discuss best practices and tips for laying out the driver circuit.
Component Placement
Component placement is a critical aspect of circuit layout, as it directly impacts signal integrity, noise performance, and thermal management. Best practices include:
- Place the laser diode and driver circuit components as close together as possible to minimize trace lengths and reduce parasitic inductance.
- Position the laser diode and its associated components (e.g., current-limiting resistor, capacitor) close to the driver circuit to minimize the loop area and reduce EMI.
- Locate the power supply decoupling capacitors as close as possible to the driver circuit to minimize supply noise and improve transient response.
Trace Routing
Trace routing plays a significant role in the performance and reliability of the laser diode driver circuit. Best practices include:
- Use wide, short traces for high-current paths to minimize resistance and inductance.
- Avoid sharp corners and angles in trace routing to reduce reflections and improve signal integrity.
- Use ground planes and power planes to provide low-impedance return paths and minimize loop areas.
- Route sensitive signal traces away from high-current or noisy traces to minimize crosstalk and interference.
Grounding and Shielding
Proper grounding and shielding are essential for minimizing noise, reducing EMI, and ensuring reliable operation of the laser diode driver circuit. Best practices include:
- Use a single-point ground topology to avoid ground loops and minimize noise coupling.
- Provide separate ground planes for analog and digital circuits to reduce noise coupling.
- Use shielding (e.g., metallic enclosures, shielding cans) to contain EMI and prevent interference with other systems.
- Connect the shield to ground at a single point to avoid creating ground loops.
Thermal Management
Effective thermal management is crucial for ensuring reliable operation and preventing damage to the laser diode and driver circuit components. Best practices include:
- Provide adequate heatsinking for the laser diode and power dissipating components, such as MOSFETs and current-sensing resistors.
- Use thermal vias and planes to efficiently transfer heat from the components to the heatsink or PCB.
- Consider using thermal interface materials (e.g., thermal grease, pads) to improve heat transfer between components and heatsinks.
- Incorporate temperature monitoring and protection circuits to detect and prevent thermal overload conditions.
Testing and Debugging
Once the pulsed laser diode driver circuit is designed and laid out, thorough testing and debugging are essential to ensure proper functionality, performance, and reliability. In this section, we will discuss some key aspects of testing and debugging the driver circuit.
Functional Testing
Functional testing involves verifying that the laser diode driver circuit operates as intended and meets the specified requirements. Key steps include:
- Verify the power supply voltage and current levels to ensure they are within the specified ranges.
- Test the driver circuit’s ability to generate the required peak current and pulse width for the laser diode.
- Measure the rise and fall times of the laser pulses to ensure they meet the specified requirements.
- Verify the pulse repetition rate and duty cycle to ensure they are within the desired range.
Performance Testing
Performance testing involves evaluating the laser diode driver circuit’s performance under various operating conditions and identifying any limitations or bottlenecks. Key aspects include:
- Measure the laser diode’s optical output power and beam characteristics (e.g., divergence, spectral width) to ensure they meet the specified requirements.
- Evaluate the driver circuit’s efficiency and power dissipation under different operating conditions (e.g., pulse width, repetition rate, duty cycle).
- Test the driver circuit’s performance over the specified temperature range to ensure reliable operation in the intended environment.
- Assess the driver circuit’s stability and jitter performance to ensure accurate and precise time-of-flight measurements.
Debugging Techniques
When issues or anomalies are identified during testing, effective debugging techniques are essential for isolating and resolving the problems. Some useful techniques include:
- Use an oscilloscope to capture and analyze the laser diode current and voltage waveforms, looking for any abnormalities or deviations from the expected behavior.
- Employ thermal imaging or temperature sensors to identify any hot spots or thermal issues in the driver circuit or laser diode.
- Use spectrum analyzers or EMI probes to detect and localize sources of electromagnetic interference.
- Perform systematic fault injection and isolation techniques to identify the root cause of any malfunctions or performance issues.
Conclusion
Pulsed laser diode driver circuits are a critical component of lidar systems, enabling the generation of high-power, short-duration laser pulses for accurate distance measurement. Designing and laying out these circuits requires careful consideration of various factors, including laser diode characteristics, power supply requirements, thermal management, and electromagnetic compatibility.
By understanding the different circuit topologies, such as current mirror drivers, switching regulator drivers, and capacitor discharge drivers, designers can select the most appropriate approach for their specific application and requirements. Proper component placement, trace routing, grounding, shielding, and thermal management are essential for achieving optimal performance and reliability.
Thorough testing and debugging, including functional testing, performance testing, and the use of appropriate debugging techniques, are crucial for identifying and resolving any issues or anomalies in the driver circuit. By following best practices and guidelines, designers can develop high-performance, reliable pulsed laser diode driver circuits for lidar applications, enabling advanced sensing and mapping capabilities in a wide range of industries and applications.
FAQs
- What is the main purpose of a laser diode driver in a lidar system?
-
The main purpose of a laser diode driver in a lidar system is to generate high-power, short-duration laser pulses that are used for measuring distances to targets by calculating the time-of-flight of the reflected light.
-
What are the key requirements for a laser diode driver in lidar applications?
-
The key requirements for a laser diode driver in lidar applications include high peak current capability, fast rise and fall times, precise pulse width control, low jitter, high efficiency, and robustness and reliability under various environmental conditions.
-
What are some common circuit topologies used for pulsed laser diode drivers?
-
Some common circuit topologies used for pulsed laser diode drivers include current mirror drivers, switching regulator drivers, and capacitor discharge drivers. Each topology has its own advantages and trade-offs in terms of peak current capability, rise and fall times, efficiency, and complexity.
-
Why is thermal management important in pulsed laser diode driver circuits?
-
Thermal management is important in pulsed laser diode driver circuits because these circuits can generate significant amounts of heat, especially when operating at high currents and duty cycles. Proper thermal management, including heatsinking, airflow, and thermal monitoring, is essential to ensure reliable operation and prevent damage to the laser diode and other components.
-
What are some best practices for laying out pulsed laser diode driver circuits?
- Some best practices for laying out pulsed laser diode driver circuits include:
- Placing components close together to minimize trace lengths and reduce parasitic inductance.
- Using wide, short traces for high-current paths and avoiding sharp corners and angles.
- Employing ground planes, power planes, and shielding to minimize noise and EMI.
- Providing adequate heatsinking and thermal management for power-dissipating components.
- Conducting thorough testing and debugging to ensure proper functionality, performance, and reliability.
No responses yet