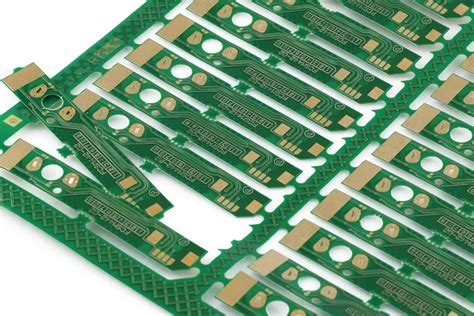
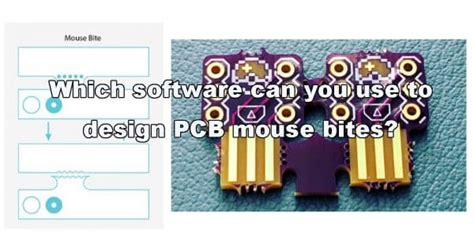
What are Mouse Bites in PCB?
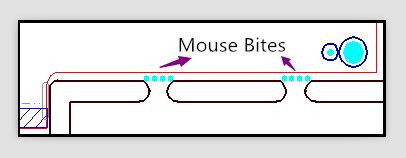
Mouse bites, also known as mouse bites PCB or Breakaway Tabs, are small notches or perforations along the edges of a printed circuit board (PCB) panel. These notches are intentionally added during the PCB fabrication process to facilitate the separation of individual PCBs from the larger panel. The term “mouse bites” comes from the resemblance of these notches to the bite marks left by a mouse on a piece of cheese.
Advantages of Using Mouse Bites in PCB Fabrication
- Easy separation: Mouse bites allow for easy and clean separation of individual PCBs from the panel without the need for specialized tools or equipment.
- Cost-effective: Implementing mouse bites is a cost-effective solution compared to other methods of PCB separation, such as scoring or routing.
- Versatility: Mouse bites can be used with various PCB materials and thicknesses, making them a versatile choice for different projects.
- Reduced stress: The presence of mouse bites helps to reduce stress on the PCB during the separation process, minimizing the risk of damage to the board or its components.
Disadvantages of Using Mouse Bites in PCB Fabrication
- Aesthetics: Mouse bites may not provide the cleanest or most aesthetically pleasing edge finish compared to other methods like scoring or routing.
- Limited space: The presence of mouse bites along the edges of the PCB can limit the available space for components or traces near the board’s perimeter.
- Potential for breakage: If the mouse bites are not designed or fabricated properly, there is a risk of accidental breakage during handling or transportation of the PCB panel.
How are Mouse Bites Created in PCB Fabrication?
Mouse bites are created during the PCB fabrication process using a specialized tool called a nibbling machine or a nibbling punch. This machine uses a small, precise punch to create the notches along the edges of the PCB panel. The process involves the following steps:
- PCB panel design: The PCB Designer incorporates mouse bites into the panel design, specifying their location, size, and spacing.
- Panel fabrication: The PCB panel is fabricated according to the design specifications, including the placement of mouse bites.
- Nibbling process: The nibbling machine or punch is used to create the mouse bites along the edges of the PCB panel, following the predetermined design.
- Separation: Once the mouse bites are created, the individual PCBs can be easily separated from the panel by applying gentle pressure along the perforated edges.
Designing Mouse Bites for Optimal PCB Fabrication
When incorporating mouse bites into your PCB panel design, consider the following factors to ensure optimal fabrication and separation:
Size and Spacing
The size and spacing of mouse bites can vary depending on the PCB material, thickness, and specific requirements of your project. As a general guideline, mouse bites typically range from 0.5mm to 1.5mm in diameter, with a spacing of 1mm to 3mm between each notch. It’s essential to consult with your PCB manufacturer to determine the appropriate size and spacing for your specific application.
Location
Mouse bites should be placed along the edges of the PCB panel, ensuring adequate clearance from any components, traces, or other critical features of the board. It’s crucial to maintain a sufficient distance between the mouse bites and the functional area of the PCB to avoid any potential damage during the separation process.
Panel Layout
When designing the PCB panel layout, consider the placement of mouse bites in relation to the individual PCBs. Ensure that the mouse bites are evenly distributed along the edges of each board and that there are no conflicts with any other features of the panel, such as tooling holes or Fiducial markers.

Best Practices for Separating PCBs with Mouse Bites
To ensure a clean and smooth separation of individual PCBs from the panel using mouse bites, follow these best practices:
- Apply even pressure: When separating the PCBs, apply gentle and even pressure along the perforated edges to avoid any unnecessary stress on the board or its components.
- Use a flat surface: Place the PCB panel on a flat, sturdy surface to provide adequate support during the separation process.
- Avoid excessive bending: Minimize any excessive bending or twisting of the panel during separation, as this can cause damage to the PCBs or components.
- Inspect separated PCBs: After separation, inspect each individual PCB for any signs of damage or defects along the edges where the mouse bites were located.
Alternative Methods for PCB Separation
While mouse bites are a common and cost-effective method for PCB separation, there are alternative techniques available:
Scoring
Scoring involves creating a shallow groove along the edges of the PCB panel using a specialized cutting tool. This groove weakens the panel material, allowing for easy separation of the individual PCBs. Scoring can provide a cleaner edge finish compared to mouse bites but may require additional equipment and setup time.
Routing
Routing uses a CNC machine to cut along the edges of the individual PCBs, completely separating them from the panel. This method offers the cleanest and most precise edge finish but is more expensive and time-consuming compared to mouse bites or scoring.
Perforating
Perforating is similar to mouse bites but involves creating a continuous line of small holes along the edges of the PCB panel instead of individual notches. This method provides a more aesthetically pleasing edge finish compared to mouse bites but may require specialized equipment and setup.
Conclusion
Mouse bites are a widely used and cost-effective method for separating individual PCBs from a larger panel during the PCB fabrication process. By understanding the advantages, disadvantages, and best practices associated with mouse bites, PCB designers and manufacturers can make informed decisions when incorporating this technique into their projects. While alternative methods like scoring, routing, and perforating exist, mouse bites remain a popular choice for their simplicity, versatility, and ease of implementation.
Frequently Asked Questions (FAQ)
-
Q: Can mouse bites be used with any PCB material and thickness?
A: Yes, mouse bites can be used with various PCB materials and thicknesses, making them a versatile choice for different projects. However, it’s essential to consult with your PCB manufacturer to determine the appropriate size and spacing of the mouse bites for your specific application. -
Q: How do mouse bites compare to other PCB separation methods in terms of cost?
A: Mouse bites are generally considered a cost-effective solution compared to other methods like scoring or routing. They require minimal additional equipment and setup time, making them an economical choice for PCB fabrication. -
Q: Are there any limitations to using mouse bites for PCB separation?
A: One limitation of using mouse bites is that they may not provide the cleanest or most aesthetically pleasing edge finish compared to other methods. Additionally, the presence of mouse bites along the edges of the PCB can limit the available space for components or traces near the board’s perimeter. -
Q: How can I ensure a clean and smooth separation of PCBs using mouse bites?
A: To ensure a clean and smooth separation, apply gentle and even pressure along the perforated edges, use a flat and sturdy surface for support, avoid excessive bending or twisting of the panel, and inspect the separated PCBs for any signs of damage or defects. -
Q: Can mouse bites be used in combination with other PCB separation methods?
A: Yes, mouse bites can be used in combination with other separation methods, such as scoring or perforating, to achieve the desired edge finish and separation characteristics for your specific PCB project. Consult with your PCB manufacturer to determine the best combination of methods for your application.
No responses yet