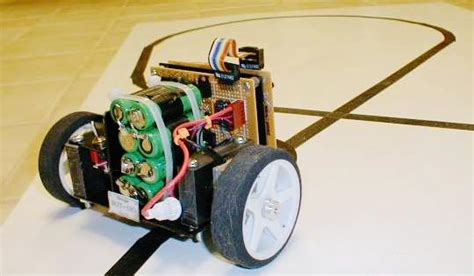
Introduction to Line Follower Robots
A Line Follower Robot is an autonomous robot that can detect and follow a line drawn on the floor. It is a self-operating robot that follows a line drawn on the ground with a contrasting color to the surface. The robot uses sensors to detect the line and navigate along its path. Line Follower Robots have a wide range of applications, including industrial automation, transportation, and entertainment.
Components Required for Building a Line Follower Robot
To build a Line Follower Robot, you will need the following components:
| Component | Description |
|---|---|
| Microcontroller | The brain of the robot, such as Arduino, Raspberry Pi, or PIC microcontroller |
| Motors | DC motors or servo motors to drive the robot’s wheels |
| Motor Driver | To control the motors based on the microcontroller’s signals |
| Sensors | Infrared (IR) sensors or color sensors to detect the line |
| Wheels | Two or more wheels for the robot’s movement |
| Battery | Power source for the robot, such as a lithium-ion battery |
| Chassis | The body of the robot to mount all the components |
Working Principle of Line Follower Robots
The working principle of a Line Follower Robot is based on the concept of light reflection. The robot uses sensors to detect the presence or absence of a line on the surface. The sensors are usually mounted on the bottom of the robot, facing the ground.
The most common types of sensors used in Line Follower Robots are:
-
Infrared (IR) Sensors: IR sensors consist of an IR emitter and an IR receiver. The emitter emits infrared light, which is reflected by the surface and detected by the receiver. When the sensor is over a white surface, most of the light is reflected, and the receiver detects high intensity. When the sensor is over a black line, the light is absorbed, and the receiver detects low intensity.
-
Color Sensors: Color sensors, such as the TCS3200 sensor, can detect the color of the surface beneath the robot. These sensors can differentiate between various colors and are useful when the line is of a specific color, such as red or green.
The sensors’ output is connected to the microcontroller, which processes the data and determines the robot’s direction. The microcontroller sends signals to the motor driver to control the motors and steer the robot along the line.
Building a Line Follower Robot Using Arduino
Arduino is a popular open-source microcontroller platform that is widely used for building Line Follower Robots. Let’s see how to build a Line Follower Robot using an Arduino board.
Required Components
- Arduino UNO board
- L298N Motor Driver Module
- IR Sensor Module (with at least 2 sensors)
- Two DC motors
- Two wheels
- Caster wheel
- Chassis
- Battery (9V or higher)
- Jumper wires
- Breadboard (optional)
Circuit Diagram
Here’s a simple circuit diagram for an Arduino-based Line Follower Robot:
[Insert Circuit Diagram Image]
Steps to Build the Robot
- Mount the motors and wheels on the chassis.
- Connect the motors to the L298N Motor Driver Module.
- Connect the IR sensors to the Arduino board. The sensor outputs should be connected to the Arduino’s digital input pins.
- Connect the L298N Motor Driver Module to the Arduino board. The module’s input pins should be connected to the Arduino’s digital output pins.
- Upload the Line Follower code to the Arduino board.
- Power the robot using the battery.
Sample Arduino Code for Line Follower Robot
Here’s a sample Arduino code for a two-sensor Line Follower Robot:
// Define motor pins
#define motor1Pin1  2
#define motor1Pin2  3
#define motor2Pin1  4
#define motor2Pin2  5

// Define IR sensor pins
#define irLeft    6
#define irRight   7

void setup() {
  // Set motor pins as output
  pinMode(motor1Pin1, OUTPUT);
  pinMode(motor1Pin2, OUTPUT);
  pinMode(motor2Pin1, OUTPUT);
  pinMode(motor2Pin2, OUTPUT);

  // Set IR sensor pins as input
  pinMode(irLeft, INPUT);
  pinMode(irRight, INPUT);
}

void loop() {
  // Read IR sensor values
  int leftSensor = digitalRead(irLeft);
  int rightSensor = digitalRead(irRight);

  // If both sensors detect the line, move forward
  if (leftSensor == LOW && rightSensor == LOW) {
    moveForward();
  }
  // If left sensor detects the line, turn left
  else if (leftSensor == LOW && rightSensor == HIGH) {
    turnLeft();
  }
  // If right sensor detects the line, turn right
  else if (leftSensor == HIGH && rightSensor == LOW) {
    turnRight();
  }
  // If no sensors detect the line, stop
  else {
    stopMotors();
  }
}

void moveForward() {
  digitalWrite(motor1Pin1, HIGH);
  digitalWrite(motor1Pin2, LOW);
  digitalWrite(motor2Pin1, HIGH);
  digitalWrite(motor2Pin2, LOW);
}

void turnLeft() {
  digitalWrite(motor1Pin1, LOW);
  digitalWrite(motor1Pin2, HIGH);
  digitalWrite(motor2Pin1, HIGH);
  digitalWrite(motor2Pin2, LOW);
}

void turnRight() {
  digitalWrite(motor1Pin1, HIGH);
  digitalWrite(motor1Pin2, LOW);
  digitalWrite(motor2Pin1, LOW);
  digitalWrite(motor2Pin2, HIGH);
}

void stopMotors() {
  digitalWrite(motor1Pin1, LOW);
  digitalWrite(motor1Pin2, LOW);
  digitalWrite(motor2Pin1, LOW);
  digitalWrite(motor2Pin2, LOW);
}

Building a Line Follower Robot Using Raspberry Pi
Raspberry Pi is a single-board computer that can be used to build more advanced Line Follower Robots with computer vision capabilities. Let’s see how to build a Line Follower Robot using a Raspberry Pi.
Required Components
- Raspberry Pi board (preferably Raspberry Pi 3 or higher)
- L298N Motor Driver Module
- Raspberry Pi Camera Module
- Two DC motors
- Two wheels
- Caster wheel
- Chassis
- Battery (5V for Raspberry Pi and 9V or higher for motors)
- Jumper wires
Steps to Build the Robot
- Mount the motors and wheels on the chassis.
- Connect the motors to the L298N Motor Driver Module.
- Connect the L298N Motor Driver Module to the Raspberry Pi’s GPIO pins.
- Connect the Camera Module to the Raspberry Pi’s camera interface.
- Install the necessary software on the Raspberry Pi (OpenCV, Python, etc.).
- Write the Line Follower code and run it on the Raspberry Pi.
- Power the Raspberry Pi and the motors using separate batteries.
Sample Python Code for Raspberry Pi Line Follower Robot
Here’s a sample Python code for a Raspberry Pi-based Line Follower Robot using computer vision:
import cv2
import numpy as np
import RPi.GPIO as GPIO

# Set up GPIO pins for motor control
motor1Pin1 = 18
motor1Pin2 = 23
motor2Pin1 = 24
motor2Pin2 = 25

GPIO.setmode(GPIO.BCM)
GPIO.setup(motor1Pin1, GPIO.OUT)
GPIO.setup(motor1Pin2, GPIO.OUT)
GPIO.setup(motor2Pin1, GPIO.OUT)
GPIO.setup(motor2Pin2, GPIO.OUT)

def main():
    # Initialize the camera
    camera = cv2.VideoCapture(0)

    while True:
        # Read a frame from the camera
        _, frame = camera.read()

        # Convert the frame to grayscale
        gray = cv2.cvtColor(frame, cv2.COLOR_BGR2GRAY)

        # Apply Gaussian blur to reduce noise
        blur = cv2.GaussianBlur(gray, (5, 5), 0)

        # Threshold the image to get a binary image
        _, thresh = cv2.threshold(blur, 60, 255, cv2.THRESH_BINARY_INV)

        # Find contours in the binary image
        contours, _ = cv2.findContours(thresh, cv2.RETR_EXTERNAL, cv2.CHAIN_APPROX_SIMPLE)

        if len(contours) > 0:
            # Find the contour with the largest area (assumed to be the line)
            c = max(contours, key=cv2.contourArea)

            # Calculate the moments of the contour
            M = cv2.moments(c)

            if M["m00"] != 0:
                # Calculate the centroid of the contour
                cx = int(M["m10"] / M["m00"])
                cy = int(M["m01"] / M["m00"])

                # Draw a circle at the centroid
                cv2.circle(frame, (cx, cy), 5, (0, 0, 255), -1)

                # Determine the direction based on the centroid position
                if cx < frame.shape[1] // 3:
                    turnLeft()
                elif cx > (frame.shape[1] * 2) // 3:
                    turnRight()
                else:
                    moveForward()
            else:
                stopMotors()
        else:
            stopMotors()

        # Display the frame
        cv2.imshow("Line Follower", frame)

        # Check for 'q' key to quit the program
        if cv2.waitKey(1) & 0xFF == ord('q'):
            break

    # Release the camera and close windows
    camera.release()
    cv2.destroyAllWindows()

    # Clean up GPIO pins
    GPIO.cleanup()

def moveForward():
    GPIO.output(motor1Pin1, GPIO.HIGH)
    GPIO.output(motor1Pin2, GPIO.LOW)
    GPIO.output(motor2Pin1, GPIO.HIGH)
    GPIO.output(motor2Pin2, GPIO.LOW)

def turnLeft():
    GPIO.output(motor1Pin1, GPIO.LOW)
    GPIO.output(motor1Pin2, GPIO.HIGH)
    GPIO.output(motor2Pin1, GPIO.HIGH)
    GPIO.output(motor2Pin2, GPIO.LOW)

def turnRight():
    GPIO.output(motor1Pin1, GPIO.HIGH)
    GPIO.output(motor1Pin2, GPIO.LOW)
    GPIO.output(motor2Pin1, GPIO.LOW)
    GPIO.output(motor2Pin2, GPIO.HIGH)

def stopMotors():
    GPIO.output(motor1Pin1, GPIO.LOW)
    GPIO.output(motor1Pin2, GPIO.LOW)
    GPIO.output(motor2Pin1, GPIO.LOW)
    GPIO.output(motor2Pin2, GPIO.LOW)

if __name__ == '__main__':
    main()

Building a Line Follower Robot Using PIC Microcontroller
PIC microcontrollers are another popular choice for building Line Follower Robots. They are known for their low cost and ease of programming. Let’s see how to build a Line Follower Robot using a PIC microcontroller.
Required Components
- PIC16F877A microcontroller
- L293D Motor Driver IC
- QTR-8A Reflectance Sensor Array
- Two DC motors
- Two wheels
- Caster wheel
- Chassis
- Battery (5V)
- Jumper wires
- PICkit programmer
Steps to Build the Robot
- Mount the motors and wheels on the chassis.
- Connect the motors to the L293D Motor Driver IC.
- Connect the QTR-8A Reflectance Sensor Array to the PIC microcontroller.
- Connect the L293D Motor Driver IC to the PIC microcontroller.
- Write the Line Follower code in MPLAB X IDE and compile it.
- Use the PICkit programmer to upload the code to the PIC microcontroller.
- Power the robot using the battery.
Sample PIC Code for Line Follower Robot
Here’s a sample PIC code for a Line Follower Robot using the QTR-8A Reflectance Sensor Array:
#include <xc.h>
#include <stdint.h>

#define _XTAL_FREQ 20000000

// Define motor pins
#define motor1Pin1  RB0
#define motor1Pin2  RB1
#define motor2Pin1  RB2
#define motor2Pin2  RB3

// Define QTR-8A sensor pins
#define sensor1     RD0
#define sensor2     RD1
#define sensor3     RD2
#define sensor4     RD3
#define sensor5     RD4
#define sensor6     RD5
#define sensor7     RD6
#define sensor8     RD7

void main(void) {
    // Set motor pins as output
    TRISB0 = 0;
    TRISB1 = 0;
    TRISB2 = 0;
    TRISB3 = 0;

    // Set QTR-8A sensor pins as input
    TRISD = 0xFF;

    while (1) {
        // Read QTR-8A sensor values
        uint8_t sensorValues = PORTD;

        // Determine the direction based on sensor values
        if ((sensorValues & 0b00011000) == 0b00011000) {
            moveForward();
        }
        else if ((sensorValues & 0b00111100) == 0b00111100) {
            moveForward();
        }
        else if ((sensorValues & 0b00011000) == 0b00001000) {
            turnLeft();
        }
        else if ((sensorValues & 0b00011000) == 0b00010000) {
            turnRight();
        }
        else {
            stopMotors();
        }
    }
}

void moveForward() {
    motor1Pin1 = 1;
    motor1Pin2 = 0;
    motor2Pin1 = 1;
    motor2Pin2 = 0;
}

void turnLeft() {
    motor1Pin1 = 0;
    motor1Pin2 = 1;
    motor2Pin1 = 1;
    motor2Pin2 = 0;
}

void turnRight() {
    motor1Pin1 = 1;
    motor1Pin2 = 0;
    motor2Pin1 = 0;
    motor2Pin2 = 1;
}

void stopMotors() {
    motor1Pin1 = 0;
    motor1Pin2 = 0;
    motor2Pin1 = 0;
    motor2Pin2 = 0;
}

Frequently Asked Questions (FAQ)
-
What is a Line Follower Robot?
A Line Follower Robot is an autonomous robot that can detect and follow a line drawn on the floor using sensors. -
What are the applications of Line Follower Robots?
Line Follower Robots have various applications, including: - Industrial automation: Used in factories for material handling and transportation.
- Warehouse management: Used for automated guided vehicles (AGVs) to transport goods.
- Parking systems: Used in smart parking systems to guide cars to available parking spaces.
-
Entertainment: Used in toy robots and robotic competitions.
-
What sensors are commonly used in Line Follower Robots?
The most common sensors used in Line Follower Robots are: - Infrared (IR) sensors: Used to detect the presence or absence of a line based on the reflected light intensity.
-
Color sensors: Used to detect the color of the line, enabling the robot to follow colored lines.
-
Can I use other microcontrollers to build a Line Follower Robot?
Yes, you can use various microcontrollers to build a Line Follower Robot, such as Arduino, Raspberry Pi, PIC, AVR, or ESP32. The choice depends on your requirements, programming skills, and available resources. -
How can I improve the performance of my Line Follower Robot?
To improve the performance of your Line Follower Robot, you can consider the following: - Use high-quality sensors with good resolution and response time.
- Implement PID (Proportional-Integral-Derivative) control for smooth and accurate line following.
- Adjust the sensor positions and angles to
No responses yet