Introduction to Circuit Board Repair
Circuit boards, also known as printed circuit boards (PCBs), are essential components in most modern electronic devices. They provide the interconnections and support for electronic components like resistors, capacitors, and integrated circuits. Over time, circuit boards can become damaged due to various factors such as physical impact, exposure to heat or moisture, or component failure. When this happens, it’s often necessary to repair the circuit board to restore the device’s functionality.
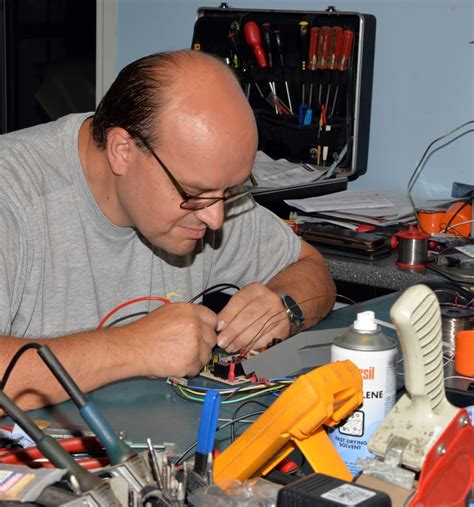
In this comprehensive guide, we’ll cover the fundamentals of circuit board repair, including the tools and techniques needed to diagnose and fix common issues. Whether you’re an electronics enthusiast, a hobbyist, or a professional technician, this article will provide you with the knowledge and skills to tackle circuit board repairs with confidence.
Understanding Circuit Board Components
Before diving into circuit board repair, it’s crucial to have a basic understanding of the various components that make up a PCB. Here are some of the most common components you’ll encounter:
Resistors
Resistors are passive components that resist the flow of electric current in a circuit. They are used to control voltage levels, divide voltages, and limit current flow. Resistors are typically marked with color codes that indicate their resistance value.
Capacitors
Capacitors are components that store electrical energy in an electric field. They are used for filtering, decoupling, and smoothing voltage fluctuations in a circuit. Capacitors come in various types, such as ceramic, electrolytic, and tantalum.
Inductors
Inductors are passive components that store energy in a magnetic field when electric current flows through them. They are used for filtering, noise suppression, and in oscillator circuits. Inductors are often wound with wire around a core material, such as ferrite or iron.
Diodes
Diodes are semiconductor devices that allow current to flow in only one direction. They are used for rectification, voltage regulation, and protection against reverse polarity. Common types of diodes include rectifier diodes, Zener diodes, and light-emitting diodes (LEDs).
Transistors
Transistors are semiconductor devices that can amplify or switch electronic signals. They are the building blocks of modern electronics and are used in a wide range of applications, from simple amplifiers to complex digital circuits. Common types of transistors include bipolar junction transistors (BJTs) and field-effect transistors (FETs).
Integrated Circuits
Integrated circuits (ICs) are miniaturized electronic circuits that consist of multiple components, such as transistors, diodes, and resistors, fabricated on a single semiconductor substrate. ICs are used in virtually all modern electronic devices and come in various types, such as microprocessors, memory chips, and operational amplifiers.

Tools for Circuit Board Repair
To effectively repair circuit boards, you’ll need a set of specialized tools. Here are some essential tools for circuit board repair:
| Tool | Description |
|---|---|
| Soldering Iron | Used for melting solder to create electrical connections |
| Solder | A metal alloy used to join electronic components |
| Desoldering Pump | A tool used to remove solder from joints |
| Solder Wick | A braided wire used to absorb and remove excess solder |
| Multimeter | A device used to measure voltage, current, and resistance |
| Oscilloscope | A device used to visualize and analyze electronic signals |
| Tweezers | Used for handling small components and wires |
| Magnifying Glass or Microscope | Used for inspecting small components and solder joints |
| Isopropyl Alcohol | Used for cleaning circuit boards and components |

Diagnosing Circuit Board Issues
Before attempting to repair a circuit board, it’s essential to diagnose the issue accurately. Here are some common techniques for diagnosing circuit board problems:
Visual Inspection
The first step in diagnosing a circuit board issue is to perform a thorough visual inspection. Look for any obvious signs of damage, such as burnt components, cracked solder joints, or corrosion. Use a magnifying glass or microscope to examine small components and solder joints closely.
Continuity Testing
Continuity testing involves checking the electrical connection between two points on a circuit board. Use a multimeter set to the continuity or resistance mode to test for continuity between various points on the board. If there is no continuity where there should be, or if there is continuity where there shouldn’t be, this can indicate a problem with the circuit board or its components.
Voltage Testing
Voltage testing involves measuring the voltage levels at various points on the circuit board to ensure they are within the expected range. Use a multimeter set to the voltage mode to measure the voltage across components and at key points in the circuit. Compare the measured voltages with the expected values from the circuit diagram or datasheet.
Signal Tracing
Signal tracing involves using an oscilloscope to visualize and analyze the electronic signals in a circuit. By probing various points on the circuit board and observing the waveforms on the oscilloscope, you can identify issues such as signal distortion, noise, or incorrect timing.

Common Circuit Board Repairs
Once you’ve diagnosed the issue with the circuit board, you can proceed with the appropriate repair. Here are some common circuit board repairs:
Soldering and Desoldering
Soldering is the process of joining electronic components to a circuit board using a metal alloy called solder. To solder a component, heat the component lead and the corresponding pad on the circuit board with a soldering iron, then apply solder to create a strong electrical and mechanical connection.
Desoldering involves removing a component from a circuit board by melting the solder joint and pulling the component out. To desolder a component, use a desoldering pump or solder wick to remove the molten solder, then gently lift the component out with tweezers.
Replacing Components
If a component on the circuit board is damaged or faulty, it may need to be replaced. To replace a component, first desolder it from the board, then clean the pads with isopropyl alcohol. Solder the new component in place, ensuring that it is oriented correctly and that the solder joints are strong and clean.
Repairing Traces
Circuit board traces are the thin copper pathways that carry electrical signals between components. If a trace is damaged, it can cause intermittent or complete loss of functionality. To repair a damaged trace, carefully scrape away the solder mask to expose the copper, then solder a small wire or Conductive Paint over the damaged area to restore the electrical connection.
Cleaning and Corrosion Prevention
Dust, dirt, and corrosion can cause issues with circuit board functionality and longevity. To clean a circuit board, use a soft brush or compressed air to remove loose debris, then clean the board with isopropyl alcohol and a lint-free cloth. To prevent corrosion, apply a thin layer of conformal coating or silicone gel to protect the board from moisture and contaminants.
Best Practices for Circuit Board Repair
To ensure successful and long-lasting circuit board repairs, follow these best practices:
- Always work in a clean, well-lit, and well-ventilated area to minimize the risk of contamination and accidents.
- Use the appropriate tools and materials for the job, and ensure they are in good condition.
- Follow proper safety precautions, such as wearing eye protection and using a fume extractor when soldering.
- Refer to the circuit diagram, datasheet, or service manual when possible to ensure accurate diagnosis and repair.
- Take your time and work methodically to avoid making mistakes or causing further damage to the circuit board.
- Test the circuit board thoroughly after the repair to ensure it is functioning correctly and reliably.
FAQ
Can I repair a circuit board myself, or should I seek professional help?
If you have the necessary skills, tools, and knowledge, you can attempt to repair a circuit board yourself. However, if you are unsure about your abilities or if the device is particularly valuable or complex, it may be best to seek the help of a professional electronics repair service.
How can I prevent circuit board damage in the future?
To prevent circuit board damage, handle devices with care, avoid exposing them to extreme temperatures, moisture, or contaminants, and use proper storage and transportation methods. Additionally, ensure that devices are properly ventilated and not subjected to excessive physical stress or vibration.
What should I do if I can’t identify the cause of a circuit board issue?
If you are unable to identify the cause of a circuit board issue after following the diagnostic steps outlined in this guide, it may be necessary to consult additional resources, such as online forums, service manuals, or professional repair services. In some cases, the issue may be too complex or obscure to diagnose without specialized knowledge or equipment.
Can I use lead-free solder for circuit board repairs?
Yes, lead-free solder can be used for circuit board repairs. However, lead-free solder typically has a higher melting point than traditional leaded solder, so it may require a higher soldering iron temperature and slightly different techniques. Be sure to use the appropriate type of solder for the specific application and follow the manufacturer’s guidelines for best results.
How do I dispose of damaged or obsolete circuit boards?
Damaged or obsolete circuit boards should be disposed of responsibly to minimize environmental impact. Many communities offer electronic waste recycling programs that can properly handle circuit boards and other electronic components. Contact your local waste management authority for information on how to dispose of circuit boards in your area. Alternatively, some electronics repair shops or online services may offer circuit board recycling or buy-back programs.
Conclusion
Circuit board repair is an essential skill for anyone involved in electronics, from hobbyists to professional technicians. By understanding the components, tools, and techniques involved in circuit board repair, you can diagnose and fix a wide range of issues, saving time, money, and resources. Remember to always prioritize safety, work methodically, and follow best practices to ensure successful and long-lasting repairs.
As technology continues to evolve, the importance of circuit board repair will only continue to grow. By staying up-to-date with the latest tools, techniques, and best practices, you can become a skilled and valuable member of the electronics repair community. With practice, patience, and persistence, anyone can master the art and science of circuit board repair.
No responses yet