Introduction to Open Source Keyboard PCB Projects
Open source keyboard PCB projects have gained popularity among DIY enthusiasts and keyboard enthusiasts alike. These projects allow individuals to create custom, ergonomic keyboards that cater to their specific needs and preferences. By utilizing open source designs and resources, makers can access a wide range of PCB layouts, firmware, and build guides to create unique and personalized keyboards.
Benefits of Open Source Keyboard PCB Projects
- Customization: Open source projects provide the flexibility to customize the keyboard layout, switch types, and firmware to suit individual preferences.
- Cost-effective: Building a keyboard from an open source PCB can be more cost-effective compared to purchasing a pre-built ergonomic keyboard.
- Learning opportunity: Engaging in an open source keyboard PCB project allows individuals to learn about electronics, soldering, and firmware programming.
- Community support: Open source projects often have active communities that provide support, resources, and inspiration for builders.
Planning the Keyboard PCB Project
Before diving into the construction process, it’s essential to plan the keyboard PCB project carefully. This involves selecting the desired keyboard layout, switch types, and components.
Choosing the Keyboard Layout
There are several popular ergonomic keyboard layouts to choose from, such as:
| Layout | Description |
|---|---|
| Split | Separates the keyboard into two halves for improved ergonomics |
| Ortholinear | Arranges keys in a grid layout for more efficient typing |
| Columnar | Staggered columns for a more natural finger positioning |
| Thumb cluster | Dedicated keys for thumbs to reduce strain on other fingers |
Consider your typing habits and ergonomic needs when selecting a layout.
Selecting Switch Types
Mechanical switches are a crucial component of a keyboard. Different switch types offer varying tactile feedback, actuation force, and sound profiles. Some popular switch types include:
- Cherry MX: Widely available and compatible with many keycap sets
- Gateron: Known for their smooth keystroke and affordable price
- Kailh: Offers a wide range of switch options, including low-profile and speed switches
- Holy Pandas: Tactile switches with a unique combination of stem and housing materials
Choose switches based on your preferred typing feel and sound.
Gathering Components and Tools
To build an open source keyboard PCB, you’ll need the following components and tools:
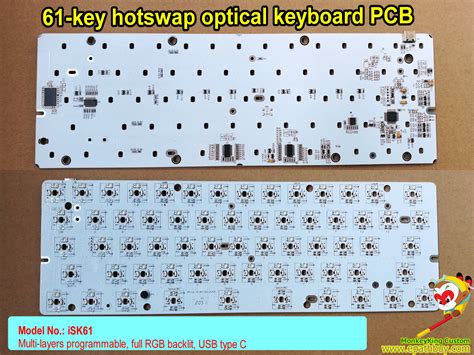
- PCB Kit or individual components (PCB, diodes, resistors, microcontroller, etc.)
- Switches
- Stabilizers (for larger keys like space bar and enter)
- Keycaps
- Soldering iron and solder
- Multimeter
- Tweezers
- Screwdrivers
- Flush cutters
Ensure you have all the necessary components and tools before starting the build process.

Constructing the Keyboard PCB
Soldering Components
- Begin by soldering the diodes to the PCB. Ensure the diode orientation is correct (black stripe towards the square pad).
- Solder the resistors, capacitors, and other small components according to the PCB Guide.
- Solder the microcontroller to the PCB, carefully aligning the pins with the corresponding holes.
- Install the switches into the PCB plate (if applicable) and solder them in place.
- Solder the stabilizers for larger keys.
Flashing the Firmware
- Download the appropriate firmware for your keyboard PCB, such as QMK or TMK.
- Customize the firmware to match your desired keymap and features.
- Flash the firmware onto the microcontroller using a programmer (e.g., USBasp) or the on-board bootloader.
- Test the keyboard to ensure all keys are functioning correctly.
Assembling the Keyboard
- Attach the PCB to the keyboard case using standoffs and screws.
- Install the keycaps onto the switches, ensuring they are aligned correctly.
- Connect the keyboard to your computer via USB and test its functionality.

Troubleshooting Common Issues
During the construction process, you may encounter some common issues. Here are a few troubleshooting tips:
| Issue | Solution |
|---|---|
| Keys not registering | Check for cold solder joints, bridged pins, or damaged components |
| Firmware not flashing | Verify the firmware file is compatible and the flashing process is correct |
| Unstable USB connection | Ensure the USB cable is securely connected and the port is functioning |
| Keycaps not fitting properly | Verify the keycap size and profile match the switches and layout |
If you encounter persistent issues, consult the open source project’s documentation or seek assistance from the community.

Resources and Community
Open Source Keyboard PCB Repositories
- Ergodox: A popular split ergonomic keyboard design
- Dactyl: A parameterized, split-hand, concave, columnar, ergonomic keyboard
- Corne: A split keyboard with 3×6 vertically staggered keys and 3 thumb keys
- Lily58: A 6×4+4 keys column-staggered split keyboard
These repositories offer PCB designs, firmware, and build guides to help you get started with your open source keyboard PCB project.
Online Communities and Forums
Engaging with online communities and forums can provide valuable insights, inspiration, and support throughout your keyboard PCB project. Some notable communities include:
- Geekhack: A forum dedicated to keyboard enthusiasts, with discussions on custom keyboards, group buys, and projects
- r/MechanicalKeyboards: A subreddit for mechanical keyboard enthusiasts, featuring project showcases, build logs, and advice
- Deskthority: A forum focused on mechanical keyboards, with resources on switch types, keycaps, and DIY projects
Participating in these communities can help you connect with like-minded individuals and expand your knowledge of open source keyboard PCB projects.
Frequently Asked Questions (FAQ)
-
Q: What programming language is used for keyboard firmware?
A: Keyboard firmware is typically written in C or C++. The most popular firmware options, such as QMK and TMK, use these languages. -
Q: Can I use any keycap set with my open source keyboard PCB?
A: Keycap compatibility depends on the switch type and keyboard layout. Ensure the keycap set you choose is compatible with your switches (e.g., Cherry MX) and accommodates your layout (e.g., split, ortholinear). -
Q: How do I customize the keymap for my keyboard?
A: Customizing the keymap involves modifying the firmware code. Most firmware options provide documentation and guides on how to define your desired keymap and compile the firmware. -
Q: What is the difference between a hotswap and soldered keyboard PCB?
A: A hotswap PCB allows you to install and remove switches without soldering, using sockets for each switch. A soldered PCB requires you to solder the switches directly to the PCB, making switch changes more difficult but providing a more secure connection. -
Q: Can I add features like RGB lighting or rotary encoders to my open source keyboard PCB?
A: Many open source Keyboard PCB Designs include provisions for additional features like RGB lighting and rotary encoders. Check the specific PCB documentation to see if these features are supported and follow the appropriate wiring and firmware configuration steps.
Conclusion
Building an open source ergonomic keyboard PCB project can be a rewarding experience that combines personalization, skill-building, and community engagement. By following this guide and leveraging the available resources and communities, you can create a unique and tailored keyboard that enhances your typing experience and ergonomics.
Remember to plan your project carefully, gather the necessary components and tools, and take your time during the construction process. Don’t hesitate to seek help from the open source keyboard community when needed.
Happy building and happy typing!

No responses yet