Introduction to Diptrace and Gerber Files
Diptrace is a powerful and user-friendly PCB Design software that allows users to create high-quality printed circuit boards. One of the essential features of Diptrace is its ability to export PCB designs to Gerber files, which are the industry standard for PCB fabrication. In this article, we will dive into the process of exporting Diptrace PCB designs to Gerber files, ensuring that your designs are ready for manufacturing.
What are Gerber Files?
Gerber files, named after the Gerber Systems Corp., are a set of files that contain all the necessary information for PCB fabrication. These files include data about the copper layers, solder mask, silkscreen, and drill holes of a PCB. Gerber files are essential for communicating your PCB design to the manufacturer, as they provide a standardized format that can be easily interpreted by fabrication equipment.
Why Export to Gerber Files?
Exporting your Diptrace PCB design to Gerber files is crucial for several reasons:
-
Compatibility: Gerber files are the most widely accepted format for PCB fabrication, ensuring that your design can be manufactured by almost any PCB fabrication house.
-
Accuracy: Gerber files contain precise information about your PCB design, minimizing the risk of manufacturing errors.
-
Efficiency: By providing your manufacturer with Gerber files, you streamline the fabrication process, reducing the likelihood of delays or miscommunications.
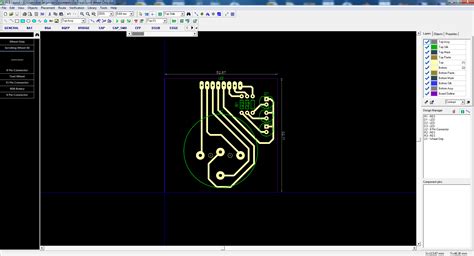
Preparing Your Diptrace PCB Design for Export
Before exporting your Diptrace PCB design to Gerber files, it’s essential to ensure that your design is complete and error-free. Follow these steps to prepare your design for export:
1. Design Rule Check (DRC)
Perform a Design Rule Check (DRC) to identify any design issues, such as short circuits, overlapping components, or incorrect trace widths. To run a DRC in Diptrace:
- Go to “Verification” in the top menu.
- Click on “Check Design Rules.”
- Configure the DRC settings according to your design requirements.
- Click “Check” to start the DRC process.
- Address any errors or warnings identified by the DRC.
2. Copper Pour and Plane Creation
If your design includes copper pour or planes, make sure to create them before exporting to Gerber files. To create a copper pour in Diptrace:
- Select the “Objects” tab in the left toolbar.
- Click on “Place Copper Pour.”
- Choose the layer on which you want to place the copper pour.
- Draw the outline of the copper pour on your PCB Layout.
- Configure the copper pour settings, such as the clearance and thermal relief.
- Click “OK” to create the copper pour.
3. Silkscreen and Solder Mask
Ensure that your silkscreen and solder mask layers are properly defined. The silkscreen layer contains component labels and other text, while the solder mask layer protects the copper traces from oxidation and short circuits. To add silkscreen and solder mask layers in Diptrace:
- Go to “Route” in the top menu.
- Click on “Add New Layer.”
- Select “Silk Screen Top” or “Silk Screen Bottom” for silkscreen layers, and “Solder Mask Top” or “Solder Mask Bottom” for solder mask layers.
- Click “OK” to add the layers to your design.
4. Board Outline
Make sure that your board outline is clearly defined. The board outline determines the shape and size of your PCB. To create a board outline in Diptrace:
- Select the “Objects” tab in the left toolbar.
- Click on “Place Board Outline.”
- Draw the outline of your PCB on the layout.
- Adjust the outline as needed using the editing tools.
Exporting Diptrace PCB to Gerber Files
Once your Diptrace PCB design is prepared, follow these steps to export it to Gerber files:
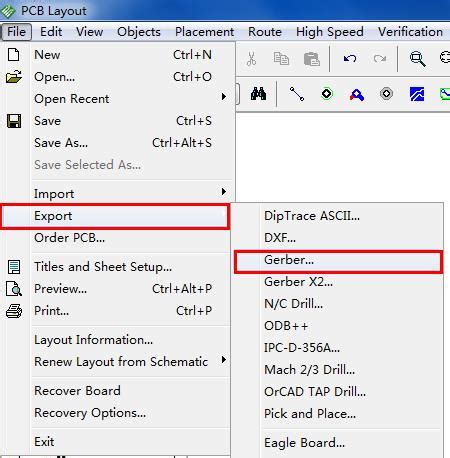
1. Open the Gerber Export Dialog
- Go to “File” in the top menu.
- Click on “Export.”
- Select “Gerber…” from the dropdown menu.
The Gerber Export dialog will appear, allowing you to configure the export settings.
2. Configure Gerber Export Settings
In the Gerber Export dialog, configure the following settings:
- Output directory: Choose the folder where you want to save the exported Gerber files.
- Prefix: Enter a prefix for the Gerber file names (e.g., your project name).
- File format: Select “RS-274X” as the Gerber file format.
- Units: Choose the appropriate units for your design (inches or millimeters).
- Aperture table: Select “Embedded” to include the aperture information within the Gerber files.
- Coordinate format: Choose the coordinate format (e.g., 4.5 for 4 integer and 5 decimal places).
- Layers: Select the layers you want to export, including copper layers, solder mask, silkscreen, and drill files.
3. Export Gerber Files
After configuring the export settings, click “Export” to generate the Gerber files. Diptrace will create a set of files in the specified output directory, typically including the following:
- Copper layers (e.g., Top.gbr, Bottom.gbr)
- Solder mask layers (e.g., SolderMask_Top.gbr, SolderMask_Bottom.gbr)
- Silkscreen layers (e.g., SilkScreen_Top.gbr, SilkScreen_Bottom.gbr)
- Drill files (e.g., Drill.drl)

Verifying Gerber Files
After exporting your Diptrace PCB design to Gerber files, it’s crucial to verify the files to ensure that they accurately represent your design. There are several methods for verifying Gerber files:
1. Visual Inspection
Open the exported Gerber files in a Gerber viewer, such as the free online viewer at https://gerber-viewer.ucamco.com/. Visually inspect each layer to ensure that the copper traces, solder mask, silkscreen, and drill holes are correctly positioned and sized.
2. Automated Verification
Use automated Gerber verification tools, such as GC-Prevue or CAM350, to check your Gerber files for potential issues, such as overlapping traces, incorrect apertures, or missing layers. These tools can help identify problems that may be difficult to spot through visual inspection alone.
3. Manufacturer Verification
Many PCB fabrication houses offer Gerber file verification as part of their services. When placing your order, ask the manufacturer to review your Gerber files and provide feedback on any potential issues or improvements.
Sending Gerber Files to the Manufacturer
Once you have verified your Gerber files, it’s time to send them to your chosen PCB fabrication house. Most manufacturers accept Gerber files via email or through their online ordering system. When placing your order, provide the following information:
- The compressed (zipped) folder containing all of your Gerber files.
- The PCB specifications, such as the board thickness, copper weight, and surface finish.
- The quantity of PCBs you require.
- Any additional services you need, such as assembly or testing.
Frequently Asked Questions (FAQ)
1. What if I encounter errors during the Gerber export process?
If you encounter errors during the Gerber export process, double-check your design for any issues, such as missing layers or incorrect settings. Ensure that your design passes the Design Rule Check (DRC) and that all layers are properly defined.
2. Can I export Gerber files from Diptrace for a multi-layer PCB?
Yes, Diptrace supports the export of Gerber files for multi-layer PCBs. When configuring the export settings, make sure to select all the necessary layers, including inner copper layers, and assign them the correct layer names and types.
3. What should I do if my manufacturer reports issues with my Gerber files?
If your manufacturer reports issues with your Gerber files, ask for specific details about the problems they encountered. Review your design and make any necessary changes, then re-export the Gerber files and send them to the manufacturer for another review.
4. Can I export Gerber files from Diptrace for Flex PCBs?
Yes, Diptrace supports the design and export of flexible PCBs. When designing a flex PCB, ensure that your design adheres to the specific requirements for flex PCBs, such as minimum bend radii and material constraints. Export the Gerber files as you would for a standard PCB, and communicate the flex PCB requirements to your manufacturer.
5. How can I ensure the best possible results when exporting Gerber files from Diptrace?
To ensure the best possible results when exporting Gerber files from Diptrace, follow these guidelines:
- Keep your design organized and well-structured, with clearly defined layers and components.
- Perform thorough Design Rule Checks (DRC) to identify and resolve any design issues.
- Communicate clearly with your PCB fabrication house about your design requirements and specifications.
- Verify your exported Gerber files using visual inspection, automated tools, and manufacturer Feedback.
- Stay updated with the latest Diptrace software releases and industry standards for PCB design and Gerber file generation.
Conclusion
Exporting your Diptrace PCB design to Gerber files is a critical step in the PCB fabrication process. By following the guidelines outlined in this article, you can ensure that your Gerber files accurately represent your design and are ready for manufacturing. Remember to prepare your design, configure the export settings, verify the exported files, and communicate clearly with your chosen PCB fabrication house. With these steps, you can successfully bring your PCB design to life and create high-quality printed circuit boards using Diptrace and Gerber files.
No responses yet