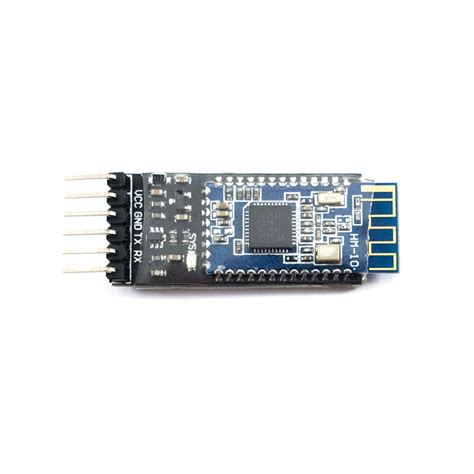
What is the HM-10 Bluetooth Module?
The HM-10 is a small, low-power BLE module based on the Texas Instruments CC2540 or CC2541 chipset. It is designed to enable wireless communication between devices, making it an ideal choice for IoT projects, wearables, and other applications that require wireless connectivity.
Key Features of the HM-10
| Feature | Description |
|---|---|
| Bluetooth Version | Bluetooth 4.0 (Bluetooth Low Energy) |
| Chipset | Texas Instruments CC2540 or CC2541 |
| Operating Voltage | 3.3V to 6V |
| Operating Current | 8.5mA (average), 50mA (peak) |
| Transmission Range | Up to 100 meters (open space) |
| Serial Communication | UART (Universal Asynchronous Receiver-Transmitter) |
| Default Baud Rate | 9600 bps |
| Dimensions | 27mm x 13mm x 2.2mm |
| Operating Temperature | -5°C to +65°C |
Interfacing with the HM-10
To work with the HM-10 module, you need to understand its pinout and how to establish a connection with a microcontroller or other devices.
HM-10 Pinout
The HM-10 module has six pins:
- VCC: Power supply (3.3V to 6V)
- GND: Ground
- TXD: UART transmit data
- RXD: UART receive data
- STATE: Connection state indicator
- EN: Enable pin (pull high to enable the module)
Connecting the HM-10 to a Microcontroller
To connect the HM-10 to a microcontroller, such as an Arduino, follow these steps:
- Connect the VCC pin to the 3.3V or 5V power supply of the microcontroller.
- Connect the GND pin to the ground of the microcontroller.
- Connect the TXD pin of the HM-10 to the RX pin of the microcontroller.
- Connect the RXD pin of the HM-10 to the TX pin of the microcontroller.
- Pull the EN pin high to enable the module.
Configuring the HM-10
The HM-10 can be configured using AT commands sent via the UART interface. Some common AT commands include:
| Command | Description |
|---|---|
| AT | Test command to check if the module is responsive |
| AT+NAME | Set or query the module’s name |
| AT+ADDR | Query the module’s MAC address |
| AT+ROLE | Set or query the module’s role (Central or Peripheral) |
| AT+BAUD | Set or query the UART baud rate |
| AT+RESET | Reset the module |
Example Configuration
To set the name of the HM-10 module to “MyDevice” and change the baud rate to 115200 bps, send the following AT commands:
AT+NAME=MyDevice
AT+BAUD115200

Applications of the HM-10
The HM-10 module finds applications in various fields, including:
- IoT (Internet of Things)
- Wearable devices
- Home automation
- Wireless sensor networks
- Robotics
- Medical devices
Example Project: Wireless Temperature Sensor
One example project using the HM-10 is a wireless temperature sensor. The setup involves:
- Connect a temperature sensor (e.g., DS18B20) to a microcontroller (e.g., Arduino).
- Connect the HM-10 module to the microcontroller as described earlier.
- Program the microcontroller to read temperature data from the sensor and send it via the HM-10 module.
- Use a BLE-enabled device (e.g., smartphone) to receive and display the temperature data.
Troubleshooting Common Issues
Module Not Responding to AT Commands
If the HM-10 module does not respond to AT commands, check the following:
- Ensure the module is powered correctly (VCC and GND connections).
- Verify the UART connections between the module and the microcontroller.
- Make sure the baud rate of the microcontroller’s serial communication matches the module’s baud rate.
- Check if the EN pin is pulled high to enable the module.
Connection Issues
If you experience connection issues, try the following:
- Ensure the module is not paired with any other devices.
- Check the distance between the HM-10 and the connected device; make sure it is within the transmission range.
- Reset the module using the AT+RESET command.
- Update the module’s firmware to the latest version, if available.
Frequently Asked Questions (FAQ)
-
Q: What is the default baud rate of the HM-10 module?
A: The default baud rate of the HM-10 module is 9600 bps. -
Q: Can I use the HM-10 module with a 3.3V microcontroller?
A: Yes, the HM-10 module can operate with a power supply ranging from 3.3V to 6V, making it compatible with both 3.3V and 5V microcontrollers. -
Q: How do I update the firmware of the HM-10 module?
A: To update the firmware of the HM-10 module, you need to use a CC Debugger and the official firmware update tool provided by the manufacturer. -
Q: What is the maximum transmission range of the HM-10 module?
A: In an open space with no obstructions, the HM-10 module can achieve a transmission range of up to 100 meters. -
Q: Can I use multiple HM-10 modules in the same project?
A: Yes, you can use multiple HM-10 modules in the same project. However, ensure that each module has a unique name and address to avoid conflicts during communication.
Conclusion
The HM-10 Bluetooth Low Energy module is a versatile and easy-to-use solution for adding wireless connectivity to your projects. With its low power consumption, small size, and support for the popular BLE protocol, the HM-10 is an excellent choice for a wide range of applications, from IoT to wearables and beyond.
By understanding the module’s features, pinout, and configuration process, you can effectively integrate the HM-10 into your projects and create innovative wireless solutions. As you explore the possibilities of the HM-10, be sure to refer to this comprehensive overview as a guide to help you navigate the world of Bluetooth Low Energy communication.

No responses yet