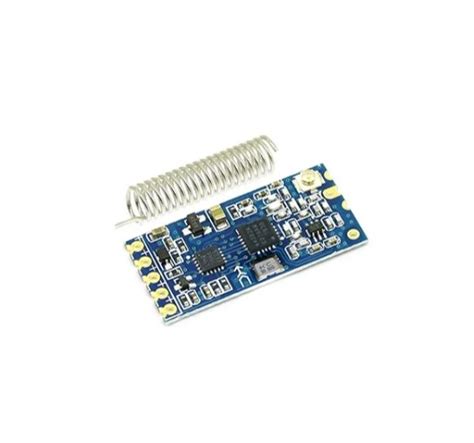
What is the HC-12 Module?
The HC-12 is a half-duplex wireless serial communication module that operates in the 433.4-473.0 MHz range. It is capable of transmitting and receiving data wirelessly between two or more devices. The module is based on the SI4463 chip from Silicon Labs and is designed for low-power, long-range wireless communication.
Key features of the HC-12 module include:
– Operating voltage: 3.2V to 5.5V
– Communication interface: UART/TTL
– Frequency range: 433.4-473.0 MHz
– RF power: up to 100mW (20dBm)
– Receiver sensitivity: -117dBm at 5000bps
– Data rate: 5000bps to 115200bps
– Range: up to 1km in open areas
– Dimensions: 27.8mm × 14.4mm × 4mm
Setting Up the HC-12 Module
To get started with the HC-12 module, you’ll need the following components:
– HC-12 module (transmitter and receiver)
– Microcontroller (e.g., Arduino, Raspberry Pi)
– Breadboard
– Jumper wires
– Power supply (3.2V to 5.5V)
Wiring the HC-12 Module
The HC-12 module has five pins: VCC, GND, RXD, TXD, and SET. Here’s how to wire the module to a microcontroller:
| HC-12 Pin | Microcontroller Pin |
|---|---|
| VCC | 5V (or 3.3V) |
| GND | GND |
| RXD | TX pin |
| TXD | RX pin |
| SET | Any GPIO pin |
Note: If using a 3.3V microcontroller, ensure that the HC-12’s VCC is also connected to 3.3V.
Configuring the HC-12 Module
The HC-12 module can be configured using AT commands sent via the UART interface. To enter AT command mode, follow these steps:
- Connect the SET pin to ground (GND) for at least 40ms.
- Send the “AT” command without a carriage return.
- Wait for the “OK” response from the module.
Some common AT commands for configuring the HC-12 module:
| Command | Description |
|---|---|
| AT+B | Set the baud rate (default: 9600) |
| AT+C | Set the channel number (001-100) |
| AT+P | Set the transmit power (1-8, default: 8) |
| AT+FU | Set the module to FU3 mode (recommended) |
Example: To set the baud rate to 115200 and the channel to 001, send the following commands:
AT+B115200
AT+C001
Communicating with the HC-12 Module
Once the HC-12 modules are configured, you can start sending and receiving data wirelessly. Here’s a simple example using Arduino:
Transmitter Code
#include <SoftwareSerial.h>

SoftwareSerial HC12(2, 3); // RX, TX

void setup() {
  HC12.begin(9600);
}

void loop() {
  HC12.println("Hello, world!");
  delay(1000);
}
Receiver Code
#include <SoftwareSerial.h>

SoftwareSerial HC12(2, 3); // RX, TX

void setup() {
  Serial.begin(9600);
  HC12.begin(9600);
}

void loop() {
  if (HC12.available()) {
    String data = HC12.readStringUntil('\n');
    Serial.println(data);
  }
}
In this example, the transmitter sends “Hello, world!” every second, and the receiver prints the received data to the serial monitor.

Practical Applications of the HC-12 Module
The HC-12 module is suitable for various wireless communication projects, such as:
- Remote sensor networks
- Home automation systems
- Robotics and RC vehicles
- Wireless data logging
- IoT devices
Here’s an example of using the HC-12 module in a remote temperature sensor project:
Transmitter (Remote Sensor)
#include <SoftwareSerial.h>
#include <DHT.h>

#define DHTPIN 4
#define DHTTYPE DHT11

DHT dht(DHTPIN, DHTTYPE);
SoftwareSerial HC12(2, 3); // RX, TX

void setup() {
  HC12.begin(9600);
  dht.begin();
}

void loop() {
  float temperature = dht.readTemperature();
  HC12.print("Temperature: ");
  HC12.print(temperature);
  HC12.println(" °C");
  delay(5000);
}
Receiver (Base Station)
#include <SoftwareSerial.h>

SoftwareSerial HC12(2, 3); // RX, TX

void setup() {
  Serial.begin(9600);
  HC12.begin(9600);
}

void loop() {
  if (HC12.available()) {
    String data = HC12.readStringUntil('\n');
    Serial.println(data);
  }
}
In this example, the remote sensor reads the temperature from a DHT11 sensor and sends the data wirelessly to the base station using the HC-12 module. The base station receives the data and prints it to the serial monitor.
Troubleshooting and Tips
- Ensure that the HC-12 modules are configured to use the same baud rate and channel number.
- Keep the modules within line-of-sight for optimal performance.
- Avoid obstacles and interference sources, such as walls, metal objects, and other electronic devices.
- Use a suitable power supply to ensure stable operation.
- Consider using an external antenna for better range and signal quality.
FAQ
-
What is the maximum range of the HC-12 module?
The HC-12 module can achieve a range of up to 1 kilometer in open areas with line-of-sight. However, the actual range may vary depending on the environment, obstacles, and interference sources. -
Can I use the HC-12 module with a 3.3V microcontroller?
Yes, the HC-12 module is compatible with 3.3V microcontrollers. Make sure to connect the VCC pin of the HC-12 to the 3.3V pin of the microcontroller. -
How do I change the baud rate of the HC-12 module?
To change the baud rate, send the “AT+B” command followed by the desired baud rate. For example, to set the baud rate to 115200, send “AT+B115200” in AT command mode. -
Is the HC-12 module compatible with other wireless communication protocols?
No, the HC-12 module uses its own proprietary protocol and is not compatible with other wireless communication protocols like Wi-Fi, Bluetooth, or Zigbee. -
Can I use multiple HC-12 modules in the same area?
Yes, you can use multiple HC-12 modules in the same area by configuring each pair of modules to use a different channel number. This allows for multiple independent wireless connections without interference.
In conclusion, the HC-12 module is a versatile and easy-to-use wireless serial communication device suitable for a wide range of embedded projects. By following the setup and configuration guidelines and understanding its capabilities and limitations, you can create reliable and efficient wireless communication systems using the HC-12 module.

No responses yet