Introduction to E Ink Displays and Raspberry Pi
E Ink displays, also known as e-Paper displays, are a type of electronic display technology that mimics the appearance of ordinary ink on paper. Unlike traditional LCD or OLED displays, E Ink displays are reflective and do not emit light, making them easy on the eyes and highly readable even in bright sunlight. These displays are commonly used in e-readers, smart labels, and low-power signage applications.
Raspberry Pi, on the other hand, is a popular single-board computer that has revolutionized the world of DIY electronics and computing. With its compact size, low power consumption, and versatile GPIO (General Purpose Input/Output) pins, Raspberry Pi is an ideal platform for interfacing with various sensors and peripherals, including E Ink displays.
In this article, we will explore how to interface an E Ink display with a Raspberry Pi, covering the necessary hardware components, software libraries, and programming techniques. By the end of this guide, you will have a solid understanding of how to create your own e-Paper projects using Raspberry Pi.
Understanding E Ink Display Technology
How E Ink Displays Work
E Ink displays consist of millions of tiny microcapsules, each containing positively charged white particles and negatively charged black particles suspended in a clear fluid. When an electric field is applied, the particles migrate to the top or bottom of the microcapsules, forming the desired image on the display surface.
The key advantages of E Ink displays include:
- Low power consumption: E Ink displays only consume power when the image is being updated, making them highly energy-efficient.
- High contrast and readability: The black and white particles create a high-contrast image that is easy to read, even in direct sunlight.
- Wide viewing angles: E Ink displays offer nearly 180-degree viewing angles without any color distortion or loss of contrast.
- Bistable nature: The display maintains the last updated image even when power is disconnected, eliminating the need for constant refreshing.
Types of E Ink Displays
There are various types of E Ink displays available in the market, differing in size, resolution, color support, and interface. Some popular types include:
- Monochrome E Ink Displays:
- These displays offer black and white (or grayscale) images and are commonly used in e-readers and low-power signage applications.
-
Examples: Waveshare 2.9-inch e-Paper Module, Adafruit 1.54-inch Monochrome E Ink Display, and Pervasive Displays 4.2-inch E Ink Panel.
-
Tri-Color E Ink Displays:
- In addition to black and white, these displays support a third color, typically red or yellow, allowing for more visually appealing content.
-
Examples: Waveshare 2.7-inch Three-Color E Ink Display, Adafruit 2.13-inch Tri-Color E Ink Display, and Pervasive Displays 2.15-inch Yellow/Black/White E Ink Panel.
-
Full-Color E Ink Displays:
- These displays can produce a wider range of colors, although the color reproduction is not as vibrant as traditional LCD or OLED displays.
- Examples: E Ink Kaleido Plus, ACeP (Advanced Color ePaper) by E Ink Corporation, and ClearInk by Clearink Displays.

Hardware Requirements
To interface an E Ink display with a Raspberry Pi, you will need the following hardware components:
- Raspberry Pi board (e.g., Raspberry Pi 4, Raspberry Pi Zero)
- E Ink display module (compatible with Raspberry Pi)
- Jumper wires or a suitable connector for connecting the display to the Raspberry Pi’s GPIO pins
- Power supply for the Raspberry Pi (e.g., microUSB power adapter or battery)
- microSD card with a compatible operating system (e.g., Raspberry Pi OS)
Ensure that you choose an E Ink display module that is compatible with your Raspberry Pi model and has the desired size, resolution, and color support for your project.

Software Requirements
To control the E Ink display using Raspberry Pi, you will need to install the necessary software libraries and dependencies. The most commonly used library for interfacing with E Ink displays is the Python-based epd-library or waveshare-epd library, which supports a wide range of Waveshare E Ink display modules.
Installing the E Ink Display Library
- Update your Raspberry Pi’s package list and install the required dependencies:
bash

   sudo apt update

   sudo apt install python3-pip python3-pil python3-numpy
- Install the
waveshare-epdlibrary using pip:
bash

   sudo pip3 install waveshare-epd
This library provides a high-level API for controlling various Waveshare E Ink display modules, making it easier to update the display content and manage the refresh process.
Configuring the Raspberry Pi
- Enable the SPI interface on your Raspberry Pi by running the following command:
bash

   sudo raspi-config
Navigate to “Interfacing Options” and select “SPI.” Enable SPI and exit the configuration tool.
- Reboot your Raspberry Pi for the changes to take effect:
bash

   sudo reboot
With the hardware and software set up, you are now ready to start programming your E Ink display using Raspberry Pi.

Programming the E Ink Display
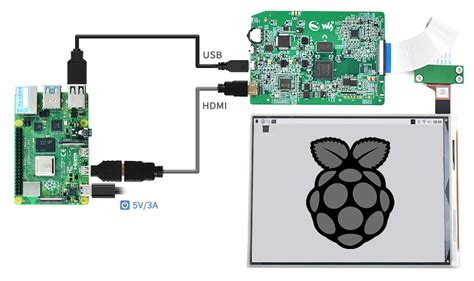
Connecting the Display to Raspberry Pi
-
Refer to the documentation or pinout diagram of your specific E Ink display module to identify the GPIO pins required for interfacing with the Raspberry Pi.
-
Using jumper wires or a suitable connector, connect the display’s pins to the corresponding GPIO pins on the Raspberry Pi. Common connections include:
-
VCC: 3.3V or 5V power supply (depending on the display module)
- GND: Ground
- DIN/MOSI: SPI MOSI (GPIO 10)
- CLK/SCK: SPI SCLK (GPIO 11)
- CS: SPI CE0 (GPIO 8) or any other available GPIO pin
- DC/RS: Data/Command selection (GPIO 25 or any other available GPIO pin)
- RST: Reset (GPIO 17 or any other available GPIO pin)
- BUSY: Busy/Wait (GPIO 24 or any other available GPIO pin)
Note: The actual pin connections may vary depending on your specific E Ink display module. Always consult the documentation for accurate pinout information.
Basic Display Operations
The waveshare-epd library provides a simple and intuitive API for controlling the E Ink display. Here are some basic operations you can perform:
- Initializing the Display:
“`python
from waveshare_epd import epd2in9
display = epd2in9.EPD()
display.init()
“`
This code initializes a 2.9-inch Waveshare E Ink display. Replace epd2in9 with the appropriate module name for your specific display size.
- Clearing the Display:
python

   display.Clear(0xFF)  # Clear the display to white
This code clears the display by setting all pixels to white (0xFF). You can also use 0x00 to clear the display to black.
- Displaying an Image:
“`python
from PIL import Image
image = Image.open(‘image.bmp’)
display.display(display.getbuffer(image))
“`
This code opens an image file named image.bmp using the Python Imaging Library (PIL) and displays it on the E Ink display. Make sure the image is in a compatible format (e.g., BMP, PNG) and has the same dimensions as the display resolution.
- Updating the Display:
python

   display.init()

   # Perform display operations

   display.sleep()
After performing display operations, you need to call display.init() to wake up the display from sleep mode and display.sleep() to put the display back into sleep mode. This helps conserve power and prolongs the lifespan of the E Ink display.
These are just a few examples of the basic operations you can perform with the waveshare-epd library. The library provides additional functions for drawing shapes, text, and more advanced display control. Refer to the library’s documentation for a complete list of available functions and their usage.
Advanced Display Techniques
Partial Refresh
One of the unique features of E Ink displays is the ability to perform partial refreshes, allowing you to update only a specific region of the display instead of the entire screen. This can significantly improve the refresh speed and reduce power consumption.
To perform a partial refresh using the waveshare-epd library:
- Define the partial refresh region:
“`python
from waveshare_epd import epd2in9
display = epd2in9.EPD()
display.init()
# Define the partial refresh region
x = 50
y = 50
width = 100
height = 100
“`
This code initializes the display and defines a partial refresh region with the top-left corner at coordinates (50, 50) and a size of 100×100 pixels.
- Update the partial refresh region:
“`python
from PIL import Image, ImageDraw
# Create a blank image for the partial refresh region
partial_image = Image.new(‘1’, (width, height), 255)
draw = ImageDraw.Draw(partial_image)
# Draw content within the partial refresh region
draw.rectangle((0, 0, width, height), fill=0)
draw.text((10, 10), ‘Hello, World!’, fill=255)
# Update the partial refresh region
display.set_partial_window(partial_image.tobytes(), x, y, x + width – 1, y + height – 1)
display.display_partial(display.getbuffer(partial_image))
“`
This code creates a blank image for the partial refresh region, draws content within that region (e.g., a rectangle and text), and updates the partial refresh region on the E Ink display.
Using partial refresh can greatly enhance the user experience by providing faster updates and smoother animations on specific areas of the display.
Grayscale and Color Support
Some E Ink displays support grayscale or even full-color output, allowing you to create more visually appealing content. To utilize grayscale or color support, you need to use the appropriate library functions and image formats.
For grayscale displays:
from PIL import Image

# Open a grayscale image
image = Image.open('grayscale_image.png').convert('L')

# Display the grayscale image
display.display(display.getbuffer(image))
This code opens a grayscale image file and displays it on the E Ink display. Make sure the image has the same dimensions as the display resolution and is in a compatible format (e.g., PNG with an ‘L’ mode for grayscale).
For full-color displays:
from PIL import Image

# Open a color image
image = Image.open('color_image.png').convert('RGB')

# Display the color image
display.display(display.getbuffer(image))
This code opens a color image file and displays it on the E Ink display. Ensure that the image has the same dimensions as the display resolution and is in a compatible format (e.g., PNG with an ‘RGB’ mode for color).
Note that the actual color reproduction on E Ink displays may not be as vibrant as traditional LCD or OLED displays due to the nature of the technology.
Project Ideas and Applications
E Ink displays powered by Raspberry Pi offer a wide range of possibilities for creative projects and practical applications. Here are a few ideas to get you started:
-
E-Book Reader: Create a portable e-book reader using a Raspberry Pi and a large E Ink display. Implement features like page turning, bookmarking, and text adjustment.
-
Weather Display: Build a low-power weather display that shows current weather conditions, temperature, and forecast using data from online APIs.
-
Smart Nameplate: Design a personalized nameplate that displays your name, title, or any other relevant information. Update the content remotely using a web interface or mobile app.
-
Calendar and Scheduler: Develop a wall-mounted calendar and scheduler that syncs with your online calendar services and displays upcoming events and tasks.
-
Information Kiosk: Create an interactive information kiosk using a Raspberry Pi and an E Ink display. Provide information about a specific location, product, or service, and update the content remotely.
-
Digital Signage: Build a network of low-power digital signage displays using Raspberry Pi and E Ink displays. Control the content centrally and update the displays wirelessly.
-
Art Display: Turn your E Ink display into a digital art frame that showcases your favorite artwork, photographs, or generated patterns. Create a web interface to manage the displayed content.
These are just a few examples of the many projects you can create using E Ink displays and Raspberry Pi. The possibilities are limited only by your imagination and the specific requirements of your application.
Troubleshooting and Common Issues
When working with E Ink displays and Raspberry Pi, you may encounter some common issues. Here are a few troubleshooting tips:
- Display Not Responding:
- Check the wiring connections between the display and the Raspberry Pi. Ensure that all pins are connected correctly and securely.
- Verify that the correct GPIO pins are being used in your code, matching the physical connections.
-
Make sure that the display is properly powered and the power supply is providing sufficient current.
-
Image Not Displayed Correctly:
- Ensure that the image file is in a compatible format (e.g., BMP, PNG) and has the same dimensions as the display resolution.
- Check that the image data is being properly converted and buffered before sending it to the display.
-
Verify that the display initialization and update functions are called in the correct order.
-
Slow Refresh Rate:
- E Ink displays have inherently slower refresh rates compared to traditional displays. This is a characteristic of the technology and not a malfunction.
- Optimize your code to minimize unnecessary display updates and utilize partial refresh techniques when possible.
-
Consider using a higher-quality E Ink display module with faster refresh rates if required for your application.
-
Ghosting or Artifacts:
- E Ink displays may exhibit ghosting or artifacts, especially when updating the display frequently or displaying complex images.
- Implement proper clearing and refreshing techniques to minimize ghosting effects.
- Experiment with different waveform modes or display driver settings provided by the library to optimize the display quality.
If you encounter any other issues or have specific questions, consult the documentation of your E Ink display module, the library’s documentation, or seek support from the relevant community forums or manufacturer’s support channels.
Frequently Asked Questions (FAQ)
- Can I use any Raspberry Pi model with an E Ink display?
-
Yes, most Raspberry Pi models, including Raspberry Pi 4, Raspberry Pi 3, and Raspberry Pi Zero, are compatible with E Ink displays. However, ensure that your chosen display module is compatible with the specific Raspberry Pi model you are using.
-
How do I power an E Ink display when using a Raspberry Pi?
-
E Ink displays typically require a 3.3V or 5V power supply, depending on the module. You can power the display directly from the Raspberry Pi’s GPIO pins if the current requirements are met. Alternatively, you can use an external power supply or battery to power the display separately.
-
Can I use multiple E Ink displays with a single Raspberry Pi?
-
Yes, you can connect multiple E Ink displays to a single Raspberry Pi by using the appropriate GPIO pins and configuring the software accordingly. However, keep in mind the available GPIO pins, power requirements, and processing capabilities of your Raspberry Pi when using multiple displays.
-
Are E Ink displays suitable for video playback or fast-moving content?
-
No, E Ink displays are not suitable for video playback or fast-moving content due to their slower refresh rates and the nature of the display technology. E Ink displays are best suited for static or slowly updating content, such as text, images, and simple animations.
-
Can I use E Ink displays in outdoor environments?
- Yes, E Ink displays are well-suited for outdoor use as they are readable even in bright sunlight and have a wide viewing angle. However, ensure that the display module is properly protected from environmental factors like dust, moisture, and extreme temperatures.
Conclusion
Interfacing an E Ink display with a Raspberry Pi opens up a world of possibilities for creating low-power, eye-friendly, and visually appealing projects. With the right hardware components, software libraries, and programming techniques, you can build a wide range of applications, from e-book readers and weather displays to digital signage and art installations.
By understanding the principles of E Ink display technology, the hardware and software requirements, and the basic programming concepts, you can start developing your own E Ink projects using Raspberry Pi. Experiment with
No responses yet