Introduction to IoT and BLE Nano
The Internet of Things (IoT) has revolutionized the way we interact with devices and collect data from the world around us. IoT enables everyday objects to be connected to the internet, allowing them to send and receive data seamlessly. One of the key technologies that have made IoT possible is Bluetooth Low Energy (BLE), a wireless communication protocol designed for low-power applications.
The Arduino BLE Nano is a powerful development board that combines the ease of use of the Arduino platform with the capabilities of BLE, making it an ideal choice for IoT projects. In this article, we will explore the features of the BLE Nano and dive into several exciting IoT projects that you can build using this versatile board.
What is the Arduino BLE Nano?
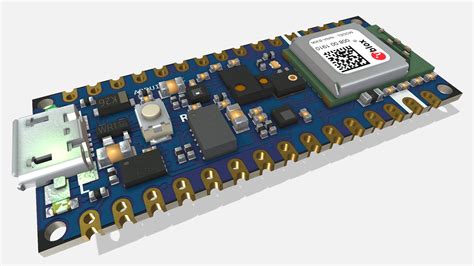
The Arduino BLE Nano is a compact development board based on the Nordic nRF52840 SoC (System on Chip). It offers the following key features:
- 32-bit ARM Cortex-M4F processor running at 64 MHz
- 1 MB of Flash memory and 256 KB of RAM
- Bluetooth 5.0 low energy connectivity
- USB Type-C connector for programming and power
- 14 digital input/output pins
- 8 analog input pins
- PWM, SPI, I2C, and UART interfaces
The BLE Nano is fully compatible with the Arduino IDE, allowing you to leverage the extensive Arduino ecosystem and libraries for your IoT projects.
Getting Started with the BLE Nano
Before we dive into the IoT projects, let’s set up the development environment for the BLE Nano.
Installing the Arduino IDE
- Visit the official Arduino website: https://www.arduino.cc/en/software
- Download the latest version of the Arduino IDE for your operating system.
- Install the Arduino IDE following the on-screen instructions.
Configuring the BLE Nano Board
- Open the Arduino IDE.
- Go to “File” > “Preferences”.
- In the “Additional Boards Manager URLs” field, enter the following URL:
https://www.arduino.cc/pro/package_index.json - Click “OK” to save the preferences.
- Go to “Tools” > “Board” > “Boards Manager”.
- Search for “Arduino nRF528x Boards” and install the latest version.
- Select “Tools” > “Board” > “Arduino BLE Nano” to set the BLE Nano as the target board.
Now you’re ready to start building IoT projects with the BLE Nano!

IoT Project 1: Wireless Temperature Sensor
In this project, we will create a wireless temperature sensor using the BLE Nano and a DHT11 temperature and humidity sensor. The sensor data will be transmitted via BLE to a mobile app or another BLE-enabled device.
Hardware Requirements
- Arduino BLE Nano
- DHT11 temperature and humidity sensor
- Breadboard
- Jumper wires
Circuit Diagram
[Insert a circuit diagram showing the connection between the BLE Nano and the DHT11 sensor]
Code
#include <ArduinoBLE.h>
#include <DHT.h>

#define DHTPIN 2
#define DHTTYPE DHT11

DHT dht(DHTPIN, DHTTYPE);

BLEService tempService("1809");
BLEFloatCharacteristic tempCharacteristic("2A1C", BLERead);

void setup() {
  Serial.begin(9600);
  dht.begin();

  if (!BLE.begin()) {
    Serial.println("Starting BLE failed!");
    while (1);
  }

  BLE.setLocalName("Temperature Sensor");
  BLE.setAdvertisedService(tempService);
  tempService.addCharacteristic(tempCharacteristic);
  BLE.addService(tempService);

  BLE.advertise();
  Serial.println("BLE Temperature Sensor");
}

void loop() {
  BLEDevice central = BLE.central();

  if (central) {
    Serial.print("Connected to central: ");
    Serial.println(central.address());

    while (central.connected()) {
      float temperature = dht.readTemperature();

      if (!isnan(temperature)) {
        tempCharacteristic.writeValue(temperature);
        Serial.print("Temperature: ");
        Serial.print(temperature);
        Serial.println(" °C");
      }

      delay(2000);
    }

    Serial.print("Disconnected from central: ");
    Serial.println(central.address());
  }
}
This code sets up the BLE Nano as a BLE peripheral device, advertising a temperature service with a float characteristic. The DHT11 sensor is read every 2 seconds, and the temperature value is written to the BLE characteristic, making it available for connected BLE central devices to read.
Testing the Project
- Upload the code to the BLE Nano.
- Use a BLE scanner app on your mobile device (e.g., nRF Connect, LightBlue) to scan for nearby BLE devices.
- Connect to the “Temperature Sensor” device.
- Read the temperature characteristic value to see the current temperature readings.

IoT Project 2: BLE-Controlled LED
In this project, we will create a BLE-controlled LED using the BLE Nano. The LED will be remotely controlled by a mobile app or another BLE-enabled device.
Hardware Requirements
- Arduino BLE Nano
- LED
- 220 ohm resistor
- Breadboard
- Jumper wires
Circuit Diagram
[Insert a circuit diagram showing the connection between the BLE Nano and the LED]
Code
#include <ArduinoBLE.h>

#define LEDPIN 13

BLEService ledService("19B10000-E8F2-537E-4F6C-D104768A1214");
BLEByteCharacteristic ledCharacteristic("19B10001-E8F2-537E-4F6C-D104768A1214", BLERead | BLEWrite);

void setup() {
  pinMode(LEDPIN, OUTPUT);

  if (!BLE.begin()) {
    while (1);
  }

  BLE.setLocalName("BLE LED");
  BLE.setAdvertisedService(ledService);
  ledService.addCharacteristic(ledCharacteristic);
  BLE.addService(ledService);

  ledCharacteristic.writeValue(0);

  BLE.advertise();
}

void loop() {
  BLEDevice central = BLE.central();

  if (central) {
    while (central.connected()) {
      if (ledCharacteristic.written()) {
        if (ledCharacteristic.value()) {
          digitalWrite(LEDPIN, HIGH);
        } else {
          digitalWrite(LEDPIN, LOW);
        }
      }
    }
  }
}
This code sets up the BLE Nano as a BLE peripheral device, advertising an LED service with a byte characteristic. When a BLE central device writes a value to the characteristic (0 for OFF, 1 for ON), the LED state is updated accordingly.
Testing the Project
- Upload the code to the BLE Nano.
- Use a BLE control app on your mobile device (e.g., nRF Connect, LightBlue) to scan for nearby BLE devices.
- Connect to the “BLE LED” device.
- Write a value (0 or 1) to the LED characteristic to control the LED state.

IoT Project 3: BLE Beacon
In this project, we will create a BLE beacon using the BLE Nano. BLE beacons are used for proximity-based applications, such as indoor navigation and location-based services.
Hardware Requirements
- Arduino BLE Nano
Code
#include <ArduinoBLE.h>

void setup() {
  if (!BLE.begin()) {
    while (1);
  }

  BLE.setLocalName("BLE Beacon");
  BLE.setManufacturerData("01020304050607"); // Example manufacturer data
  BLE.setAdvertisingInterval(100); // 100 ms advertising interval

  BLE.advertise();
}

void loop() {
  // The beacon only needs to advertise, so no loop code is required
}
This code sets up the BLE Nano as a BLE beacon, advertising with a specific manufacturer data payload. The advertising interval is set to 100 ms, which determines how frequently the beacon broadcasts its presence.
Testing the Project
- Upload the code to the BLE Nano.
- Use a BLE scanner app on your mobile device (e.g., nRF Connect, LightBlue) to scan for nearby BLE devices.
- Look for the “BLE Beacon” device and observe the manufacturer data payload.
IoT Project 4: BLE Serial Communication
In this project, we will establish BLE serial communication between the BLE Nano and a mobile app or another BLE-enabled device. This allows bidirectional data exchange between the devices.
Hardware Requirements
- Arduino BLE Nano
Code
#include <ArduinoBLE.h>

BLEService serialService("6E400001-B5A3-F393-E0A9-E50E24DCCA9E");
BLEStringCharacteristic rxCharacteristic("6E400002-B5A3-F393-E0A9-E50E24DCCA9E", BLEWrite, 20);
BLEStringCharacteristic txCharacteristic("6E400003-B5A3-F393-E0A9-E50E24DCCA9E", BLERead | BLENotify, 20);

void setup() {
  Serial.begin(9600);

  if (!BLE.begin()) {
    Serial.println("Starting BLE failed!");
    while (1);
  }

  BLE.setLocalName("BLE Serial");
  BLE.setAdvertisedService(serialService);
  serialService.addCharacteristic(rxCharacteristic);
  serialService.addCharacteristic(txCharacteristic);
  BLE.addService(serialService);

  rxCharacteristic.setEventHandler(BLEWritten, rxCharacteristicWritten);

  BLE.advertise();
  Serial.println("BLE Serial ready");
}

void loop() {
  BLEDevice central = BLE.central();

  if (central) {
    Serial.print("Connected to central: ");
    Serial.println(central.address());

    while (central.connected()) {
      if (Serial.available()) {
        String data = Serial.readString();
        txCharacteristic.writeValue(data);
      }
    }

    Serial.print("Disconnected from central: ");
    Serial.println(central.address());
  }
}

void rxCharacteristicWritten(BLEDevice central, BLECharacteristic characteristic) {
  String data = rxCharacteristic.value();
  Serial.print("Received data: ");
  Serial.println(data);
}
This code sets up the BLE Nano as a BLE peripheral device, advertising a serial service with two string characteristics: one for receiving data (RX) and one for transmitting data (TX). When data is written to the RX characteristic by a connected BLE central device, it is printed on the serial monitor. Data sent via the serial monitor is written to the TX characteristic, making it available for the connected BLE central device to read.
Testing the Project
- Upload the code to the BLE Nano.
- Use a BLE terminal app on your mobile device (e.g., nRF Connect, BLE Terminal) to scan for nearby BLE devices.
- Connect to the “BLE Serial” device.
- Write data to the RX characteristic to send it to the BLE Nano.
- Read the TX characteristic to receive data sent from the BLE Nano via the serial monitor.
Frequently Asked Questions (FAQ)
-
Q: Can I use the Arduino BLE Nano with other Arduino libraries?
A: Yes, the Arduino BLE Nano is compatible with most Arduino libraries, allowing you to extend its functionality and integrate it with various sensors and modules. -
Q: What is the range of the BLE Nano?
A: The range of the BLE Nano depends on various factors, such as the environment and obstacles. In an open area, it can typically reach up to 100 meters. However, in indoor environments with walls and obstructions, the range may be reduced. -
Q: Can I control multiple BLE Nanos from a single mobile app?
A: Yes, you can create a mobile app that scans for and connects to multiple BLE Nano devices. Each device will have its own unique BLE address, allowing you to communicate with them individually. -
Q: Is the Arduino BLE Nano suitable for battery-powered projects?
A: Yes, the BLE Nano is designed for low-power applications. It can be powered by a battery and programmed to enter sleep modes to conserve energy when not in use. -
Q: Can I update the firmware of the BLE Nano over-the-air (OTA)?
A: Yes, the Nordic nRF52840 SoC used in the BLE Nano supports OTA firmware updates. You can implement OTA functionality in your code to allow wireless firmware updates without the need for a physical connection.
Conclusion
The Arduino BLE Nano is a versatile development board that opens up a world of possibilities for IoT projects. With its powerful processor, BLE connectivity, and compatibility with the Arduino ecosystem, the BLE Nano enables you to create wireless sensors, control devices remotely, establish BLE beacons, and exchange data seamlessly.
By following the project examples provided in this article, you can start building your own IoT applications using the BLE Nano. Whether you’re a beginner or an experienced developer, the BLE Nano offers a user-friendly platform to bring your ideas to life.
Remember to explore the extensive Arduino community and resources available online for further inspiration and support. Happy IoT prototyping with the Arduino BLE Nano!
No responses yet