Introduction to Arduino Ultrasonic Sensor
An Arduino Ultrasonic Sensor, also known as the HC-SR04, is a popular and versatile sensor used in various applications, including distance measurement, object detection, and level sensing. This sensor uses ultrasonic sound waves to determine the distance between itself and an object, making it an essential tool for many Arduino projects.
In this comprehensive guide, we will explore the Arduino Ultrasonic Sensor in detail, covering its working principle, specifications, wiring, programming, and practical applications. By the end of this article, you will have a thorough understanding of how to use the HC-SR04 sensor effectively in your Arduino projects.
How Does an Arduino Ultrasonic Sensor Work?
The Arduino Ultrasonic Sensor works on the principle of sound wave reflection. It consists of two main components: an ultrasonic transmitter and an ultrasonic receiver. The transmitter emits high-frequency sound waves (typically 40 kHz) that travel through the air until they encounter an object. When the sound waves hit the object, they bounce back towards the sensor, and the receiver detects these reflected waves.
By measuring the time it takes for the sound waves to travel from the transmitter to the object and back to the receiver, the sensor can calculate the distance between itself and the object using the following formula:
Distance = (Speed of Sound × Time) / 2
The speed of sound in air is approximately 343 meters per second (at room temperature). The time is divided by 2 because the sound waves travel twice the distance between the sensor and the object (forward and backward).

HC-SR04 Sensor Specifications
To effectively use the HC-SR04 sensor in your Arduino projects, it is essential to understand its specifications. The following table outlines the key specifications of the HC-SR04 sensor:
| Specification | Value |
|---|---|
| Operating Voltage | 5V DC |
| Current Consumption | 15mA |
| Frequency | 40 kHz |
| Minimum Range | 2 cm (0.8 inches) |
| Maximum Range | 400 cm (157.5 inches) |
| Measuring Angle | 15 degrees |
| Trigger Input Pulse Width | 10 µs |
| Dimensions | 45 × 20 × 15 mm |
It is important to note that the HC-SR04 sensor requires a 5V power supply, which is compatible with most Arduino boards. The sensor’s range is suitable for a wide variety of applications, from short-range object detection to long-range distance measurement.

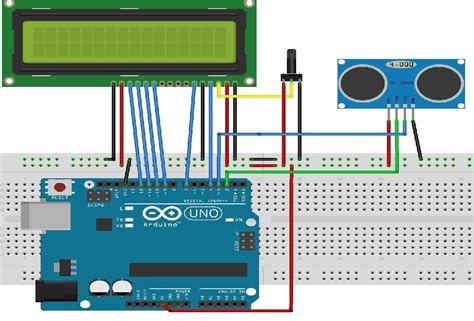
Wiring the HC-SR04 Sensor to Arduino
To use the HC-SR04 sensor with your Arduino board, you need to connect the sensor pins to the appropriate Arduino pins. The HC-SR04 sensor has four pins:
- VCC: Connect to the 5V power supply pin on the Arduino board.
- Trig: Connect to any digital output pin on the Arduino board. This pin will send the trigger signal to the sensor.
- Echo: Connect to any digital input pin on the Arduino board. This pin will receive the echo signal from the sensor.
- GND: Connect to the ground pin on the Arduino board.
The following table shows an example of how you can connect the HC-SR04 sensor to an Arduino Uno board:
| HC-SR04 Pin | Arduino Uno Pin |
|---|---|
| VCC | 5V |
| Trig | Digital Pin 9 |
| Echo | Digital Pin 10 |
| GND | GND |

Programming the Arduino Ultrasonic Sensor
To read distance measurements from the HC-SR04 sensor using an Arduino board, you need to write a program that sends a trigger signal to the sensor and calculates the distance based on the duration of the echo signal. Here’s an example Arduino sketch that demonstrates how to use the HC-SR04 sensor:
const int trigPin = 9;
const int echoPin = 10;

long duration;
int distance;

void setup() {
  pinMode(trigPin, OUTPUT);
  pinMode(echoPin, INPUT);
  Serial.begin(9600);
}

void loop() {
  digitalWrite(trigPin, LOW);
  delayMicroseconds(2);

  digitalWrite(trigPin, HIGH);
  delayMicroseconds(10);
  digitalWrite(trigPin, LOW);

  duration = pulseIn(echoPin, HIGH);
  distance = duration * 0.034 / 2;

  Serial.print("Distance: ");
  Serial.print(distance);
  Serial.println(" cm");

  delay(500);
}
In this sketch:
- We define the trigPin and echoPin constants to specify the Arduino pins connected to the HC-SR04 sensor’s Trig and Echo pins, respectively.
- In the setup() function, we set the trigPin as an output and the echoPin as an input. We also initialize the serial communication at a baud rate of 9600.
- In the loop() function, we send a 10 µs trigger pulse to the sensor by setting the trigPin HIGH for 10 microseconds and then LOW.
- We measure the duration of the echo signal using the pulseIn() function, which returns the time in microseconds.
- We calculate the distance in centimeters using the formula: distance = duration * 0.034 / 2. The factor 0.034 is derived from the speed of sound in air (343 m/s or 0.0343 cm/µs) divided by 2, as the sound wave travels twice the distance between the sensor and the object.
- Finally, we print the distance on the serial monitor and add a 500 ms delay before the next measurement.
Upload this sketch to your Arduino board, and you should see the distance measurements printed on the serial monitor every 500 milliseconds.
Practical Applications of Arduino Ultrasonic Sensor
The Arduino Ultrasonic Sensor is a versatile tool that can be used in various applications. Some of the most common applications include:
- Obstacle Detection: The HC-SR04 sensor can be used to detect obstacles in the path of a robot or vehicle, enabling it to navigate safely.
- Distance Measurement: The sensor can measure distances between 2 cm and 400 cm, making it useful for projects that require accurate distance measurements.
- Level Sensing: By mounting the sensor above a container, you can use it to measure the level of liquid or solid materials inside the container.
- Automatic Door Control: The sensor can be used to detect the presence of a person or object near a door and trigger the door to open or close automatically.
- Parking Assist System: By integrating multiple HC-SR04 sensors, you can create a parking assist system that helps drivers park their vehicles safely and efficiently.
Tips for Using the Arduino Ultrasonic Sensor
To get the most out of your HC-SR04 sensor and ensure accurate measurements, consider the following tips:
- Mount the sensor securely: Ensure that the sensor is mounted firmly and does not vibrate or move during operation, as this can affect the accuracy of the measurements.
- Avoid obstacles: Make sure there are no obstacles between the sensor and the object you want to measure, as this can cause false readings or reflections.
- Calibrate the sensor: If you require highly accurate measurements, consider calibrating the sensor using a known distance and adjusting your code accordingly.
- Use a voltage divider: If you are using a 3.3V Arduino board, such as the Arduino Due, you may need to use a voltage divider to step down the 5V echo signal from the sensor to avoid damaging your board.
- Implement error handling: Include error handling in your code to deal with situations where the sensor does not receive an echo signal or measures a distance outside its range.
Frequently Asked Questions (FAQs)
-
Q: Can I use the HC-SR04 sensor with a 3.3V Arduino board?
A: Yes, you can use the HC-SR04 sensor with a 3.3V Arduino board, but you will need to use a voltage divider to step down the 5V echo signal from the sensor to 3.3V to avoid damaging your board. -
Q: What is the minimum and maximum distance that the HC-SR04 sensor can measure?
A: The HC-SR04 sensor can measure distances between 2 cm (0.8 inches) and 400 cm (157.5 inches). -
Q: How accurate is the HC-SR04 sensor?
A: The accuracy of the HC-SR04 sensor depends on various factors, such as the ambient temperature, humidity, and the reflectivity of the object being measured. In general, the sensor is accurate to within 3 mm for distances up to 2 meters. -
Q: Can I use multiple HC-SR04 sensors with a single Arduino board?
A: Yes, you can use multiple HC-SR04 sensors with a single Arduino board. However, you will need to use different trigger and echo pins for each sensor and ensure that the sensors do not interfere with each other. -
Q: How can I improve the range of the HC-SR04 sensor?
A: To improve the range of the HC-SR04 sensor, you can try using a larger surface area for the object being measured, as this will increase the amount of sound waves reflected back to the sensor. You can also experiment with different mounting angles and positions for the sensor to optimize its performance.
Conclusion
The Arduino Ultrasonic Sensor (HC-SR04) is a powerful and versatile tool for measuring distances and detecting objects in a wide range of applications. By understanding its working principle, specifications, wiring, and programming, you can effectively integrate this sensor into your Arduino projects and create innovative solutions for obstacle detection, distance measurement, level sensing, and more.
Remember to consider the tips and best practices outlined in this guide to ensure accurate and reliable measurements from your HC-SR04 sensor. With the knowledge gained from this comprehensive article, you are now well-equipped to explore the exciting possibilities of the Arduino Ultrasonic Sensor and take your projects to the next level.
No responses yet