1. Choose the Right Drill Bit for the Material
One of the most important factors in successful drilling is selecting the appropriate drill bit for the material you’re working with. Different materials require different types of drill bits to achieve clean, precise holes and avoid damage to the bit or workpiece. Here’s a quick guide:
| Material | Recommended Drill Bit |
|---|---|
| Wood | Brad point bits, spade bits, auger bits |
| Metal | High-speed steel (HSS) bits, cobalt bits |
| Plastic | Brad point bits, twist bits |
| Masonry | Masonry bits, hammer drill bits |
| Tile/Glass | Diamond-tipped bits, carbide-tipped bits |
Wood Drill Bits
For drilling into wood, brad point bits are a great choice for precise, clean holes. The sharp center point helps prevent wandering, while the outer spurs shear the wood fibers for a smooth finish. Spade bits and auger bits are useful for boring large diameter holes.
Metal Drill Bits
When drilling into metal, high-speed steel (HSS) bits are the most common choice. These bits are durable and can handle the high heat generated by drilling metal. For tougher metals like stainless steel or cast iron, cobalt bits provide even greater heat and wear resistance.
Plastic Drill Bits
Many standard twist bits and brad point bits work well for drilling holes in plastic materials. It’s important to use slower speeds and clear chips frequently to avoid melting the plastic.
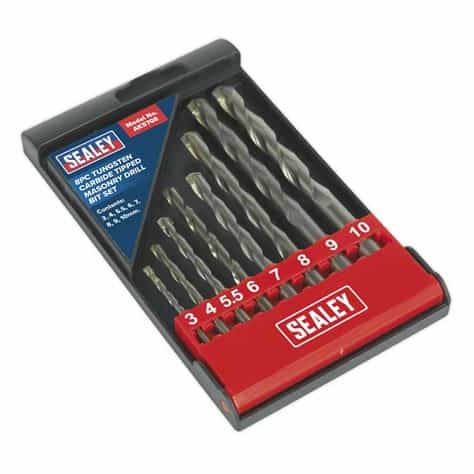
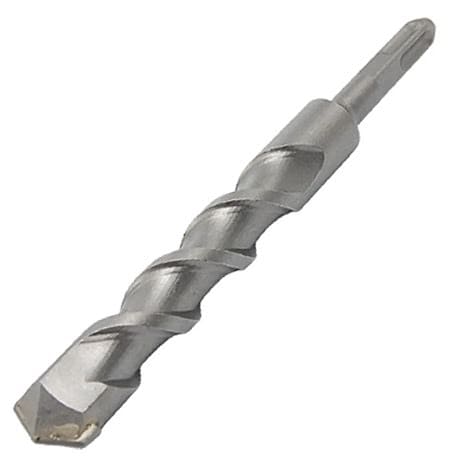
Masonry Drill Bits
For drilling into concrete, brick, or stone, you’ll need a masonry bit. These have a carbide tip that can withstand the abrasive materials. A hammer drill is recommended for masonry work, as the percussive action helps the bit penetrate the surface.
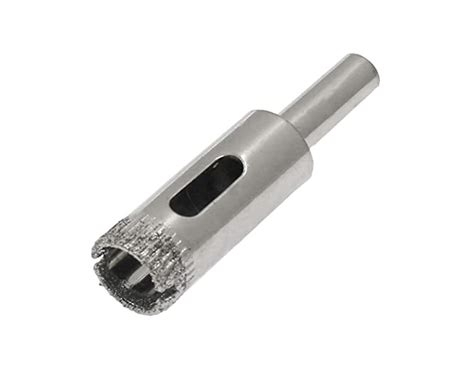
Tile/Glass Drill Bits
Drilling into tile or glass requires a specialized bit to prevent cracking and chipping. Diamond-tipped bits are the most durable and effective. Carbide-tipped bits can also be used but may wear out faster. Use very slow speeds and light pressure when drilling these delicate materials.
2. Use the Correct Drilling Speed
In addition to choosing the right type of bit, it’s crucial to use the appropriate drilling speed for the material and bit diameter. In general, harder materials and smaller diameter bits require slower speeds, while softer materials and larger bits allow for faster drilling.
Here are some guidelines for drilling speeds based on bit diameter:
| Bit Diameter | Speed for Soft Materials | Speed for Hard Materials |
|---|---|---|
| 1/16″ (1.5mm) | 3,000 RPM | 1,500 RPM |
| 1/8″ (3mm) | 2,000 RPM | 1,000 RPM |
| 1/4″ (6mm) | 1,000 RPM | 500 RPM |
| 1/2″ (13mm) | 500 RPM | 250 RPM |
| 1″ (25mm) | 250 RPM | 125 RPM |
Remember, these are just general recommendations. Always start at a slower speed and gradually increase it as needed. If you see smoke or feel the bit overheating, you’re probably drilling too fast.
Using the proper drilling speed will help your bits last longer and produce cleaner results. Many modern drills have adjustable speed settings to dial in just the right RPM for the task.
3. Apply Proper Pressure and Let the Bit Do the Work
Applying the right amount of pressure is key to efficient drilling and extending the life of your bits. Many novice users make the mistake of pushing too hard, thinking it will make the bit cut faster. However, excessive pressure can actually cause the bit to overheat, dull quickly, or break.
The correct technique is to let the bit do most of the work. The sharp cutting edges and flutes are designed to remove material effectively. Start with light pressure to create a pilot divot and gradually increase pressure as the bit begins to cut.
Maintain steady, moderate pressure throughout the cut, enough to create chips but not so much that the drill bogs down or the bit flexes. If you’re having to lean into the drill to make progress, you’re probably using too much pressure.
On the other hand, too little pressure can cause the bit to rub and wear without cutting efficiently. Find the balance where the bit is cutting continuously and clearing chips as it goes.

4. Clear Chips and Debris Frequently
As drill bits cut through material, they create chips and debris that can clog the flutes and cause heat buildup. This is especially problematic when drilling deep holes, as the chips have nowhere to go and can quickly pack in around the bit.
To keep your drill bits cutting smoothly and avoid overheating, it’s important to clear chips frequently. Every few seconds of drilling, especially in metals, pull the bit out of the hole to evacuate the chips before they accumulate excessively.
You can also use compressed air or a brush to clean the flutes periodically. For deep holes, pecking the bit in and out repeatedly allows chips to clear and also helps prevent the bit from wandering off course.
In some materials like green wood or soft plastics, chips can become gummy and stick to the bit. Rubbing a bit of wax or spraying a lubricant on the bit can help prevent chips from adhering and clogging the flutes.
Proper chip clearing promotes faster, more efficient drilling, better hole quality, and longer bit life. Get in the habit of retracting the bit often to keep it cutting its best.
5. Keep Drill Bits Sharp and Stored Properly
Finally, one of the best ways to ensure top performance from your drill bits is to keep them sharp and well-maintained. Even the best quality bits will dull over time with regular use, and dull bits require more force, cut slowly, and produce rougher holes.
You can use a drill bit sharpener or bench grinder to restore dull bits to like-new condition. Sharpening by hand takes some skill and practice, but there are also jigs and guides available to simplify the process.
If you’re not comfortable sharpening your own bits, many hardware stores and tool suppliers offer professional bit sharpening services for a reasonable fee.
In between uses, store your bits properly to prevent dulling and damage. Many drill bit sets come with storage cases or boxes to keep them organized. You can also use a drill index or bit holder to secure loose bits.
Avoid tossing drill bits in a drawer or toolbox where they can bang together and chip the cutting edges. Never use bits with chipped, broken, or heavily worn cutting edges, as they can cause injury and produce poor results.
With proper sharpening and storage habits, your drill bits can provide years of reliable service and always be ready to make clean, accurate holes on demand.
FAQ
What drill bit should I use for hardened steel?
For drilling into hardened steel, cobalt drill bits are the best choice. These bits are made from a super-tough cobalt alloy that can withstand the high heat and abrasion of working with hard metals. Carbide-tipped bits are another option for extremely hard materials.
Can I use a regular drill bit in a hammer drill?
In most cases, no. Hammer drills are designed for use with specialized masonry bits that have a carbide tip and fluted design to handle the percussive hammering action. Using a regular drill bit in a hammer drill can damage both the bit and the drill. Always use the appropriate type of bit for your drilling mode and material.
Why does my drill bit keep slipping?
There are a few reasons your drill bit might slip or wander when starting a hole:
- The drill is not held perpendicular to the work surface.
- The drill speed is too high for the bit and material.
- The bit is dull or damaged.
- You’re not using enough pressure to keep the bit engaged.
To prevent slipping, start with the drill square to the surface and a slow speed. Use a sharp bit and apply steady pressure as you begin drilling. A center punch dimple can also help guide the bit and prevent walking.
How do I prevent my drill bit from overheating?
Drill bits overheat when they’re used at too high a speed or with too much pressure for the material being drilled. To prevent overheating:
- Use the correct speed for the bit size and material hardness.
- Apply only moderate pressure and let the bit do the work.
- Clear chips frequently to prevent clogging and heat buildup.
- Use cutting fluid or coolant when drilling metals.
If your bit starts smoking or discoloring, stop drilling and allow it to cool before continuing at a slower speed.
What’s the difference between a black oxide and a titanium drill bit?
Black oxide bits have a black finish that provides some heat and corrosion resistance, as well as lubricity for chip evacuation.
Titanium bits are actually HSS bits coated with titanium nitride (TiN), which is a ceramic coating that is extremely hard and heat resistant. The gold-colored coating also helps the bit resist corrosion and improves chip flow.
In general, titanium bits offer superior durability and cutting performance, and can be worth the extra cost for heavy-duty drilling applications. Black oxide bits are an economical choice for general purpose drilling in a variety of materials.
No responses yet