What is PCB Art?
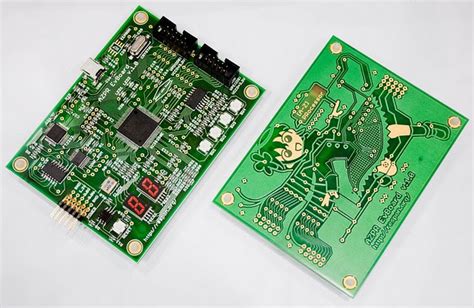
PCB art is a unique form of electronic artwork that combines the functionality of printed circuit boards (PCBs) with artistic designs. By creatively arranging the copper traces, components, and solder mask layers, designers can create visually stunning boards that not only serve their electronic purpose but also act as a canvas for artistic expression.
Why Create PCB Art?
There are several reasons why people choose to create PCB art:
- Aesthetics: PCB art adds a unique visual appeal to electronic projects, making them stand out from standard, purely functional boards.
- Personalization: Creating custom PCB art allows designers to personalize their projects and express their creativity.
- Showcase Skills: PCB art can showcase a designer’s skills in both electronics and artistic design.
- Marketability: Visually striking PCBs can be more marketable, especially for consumer-facing products.

Planning Your PCB Art Design
Before diving into the design process, it’s essential to plan your PCB art project carefully.
Define Your Objectives
Determine the primary purpose of your PCB art project. Is it purely decorative, or does it need to serve a specific electronic function? Clearly defining your objectives will help guide your design choices.
Choose Your Canvas Size
PCBs come in various sizes, so choose a canvas size that suits your project’s needs. Consider the space required for your electronic components and the overall aesthetic you want to achieve.
Select Your Components
Choose electronic components that not only fulfill your project’s functional requirements but also contribute to the overall artistic composition. Consider factors such as component size, shape, and color when making your selections.

Designing Your PCB Art
With your plan in place, it’s time to start designing your PCB art.
Sketch Your Design
Begin by sketching your design ideas on paper. Experiment with different layouts, patterns, and shapes until you find a composition that you like.
Use PCB Design Software
Transfer your sketch to a PCB design software such as KiCad or Eagle. These tools allow you to create precise layouts and ensure that your design adheres to manufacturing guidelines.
Incorporate Artistic Elements
Use the copper traces, silkscreen layer, and solder mask to incorporate artistic elements into your design. Consider techniques such as:
- Trace Routing: Create intricate patterns and shapes using the copper traces.
- Silkscreen Graphics: Add text, logos, or images to the silkscreen layer.
- Solder Mask Coloring: Experiment with different solder mask colors to enhance your design.
Adhere to Manufacturing Guidelines
While creating your PCB art, it’s crucial to adhere to manufacturing guidelines to ensure that your board can be successfully produced. This includes factors such as minimum trace width, clearance between components, and drill sizes.

Manufacturing Your PCB Art
Choose a PCB Manufacturer
Select a reputable PCB manufacturer that can produce high-quality boards and accommodate your artistic design. Some manufacturers specialize in PCB art and offer additional services such as custom solder mask colors or special finishes.
Prepare Your Files
Prepare your design files according to the manufacturer’s specifications. This typically includes generating Gerber files, drill files, and a bill of materials (BOM).
Review and Refine
Before submitting your files for manufacturing, thoroughly review your design for any errors or potential issues. Make refinements as necessary to ensure the best possible results.
Showcasing Your PCB Art
Assemble Your Board
Once you receive your manufactured PCB, carefully assemble the components according to your design. Take your time to ensure proper placement and soldering.
Display Your Work
Find creative ways to display your PCB art. This can include framing your board, incorporating it into a larger art piece, or integrating it into a functional electronic project.
Share Your Creation
Share your PCB art with others through social media, online galleries, or in-person exhibitions. Engage with the PCB art community to gain inspiration and feedback from other designers.
FAQ
1. What skills do I need to create PCB art?
To create PCB art, you should have a basic understanding of electronics and PCB design principles. Familiarity with PCB design software and artistic design concepts is also beneficial.
2. Can I create PCB art without electronic functionality?
Yes, you can create purely decorative PCB art without any electronic functionality. However, you should still adhere to manufacturing guidelines to ensure that your board can be successfully produced.
3. How much does it cost to manufacture PCB art?
The cost of manufacturing PCB art varies depending on factors such as board size, complexity, and the manufacturer you choose. Some manufacturers offer special pricing for PCB art projects.
4. Can I incorporate non-traditional materials into my PCB art?
While it’s possible to incorporate non-traditional materials into your PCB art, it’s essential to consider the manufacturing process and ensure that your design can be successfully produced.
5. How can I learn more about PCB art design?
There are many online resources available for learning about PCB art design, including tutorials, forums, and social media groups. Engaging with the PCB art community and experimenting with your own designs are also great ways to learn and improve your skills.
Conclusion
PCB art is a fascinating intersection of electronics and artistic design, offering endless opportunities for creativity and self-expression. By carefully planning your design, incorporating artistic elements, and adhering to manufacturing guidelines, you can create visually stunning boards that showcase your skills and personality. Whether you’re a seasoned electronics designer or a beginner exploring the world of PCB art, the process of designing and manufacturing your own artistic boards can be a rewarding and enjoyable experience.
No responses yet