Introduction to Raspberry Pi Robotics
The Raspberry Pi is a popular single-board computer that makes an excellent platform for building robots and learning about robotics. With its affordable price, powerful processor, and ability to run Linux, the Raspberry Pi opens up a world of possibilities for creating custom robot projects.
In this guide, we’ll walk through the steps to build your own Raspberry Pi robot from scratch. We’ll cover the hardware components you’ll need, how to assemble the chassis and electronics, and the software setup required to program your robot. By the end, you’ll have a fully functioning Raspberry Pi robot that you can control and customize.
Whether you’re a beginner looking to get started with robotics or an experienced maker seeking a new project, building a Raspberry Pi robot is a fun and rewarding experience. Let’s dive in and explore what it takes to create your own Pi-powered bot!
Hardware Components Needed
Before we start building, let’s go over the key hardware components you’ll need for your Raspberry Pi robot:
1. Raspberry Pi Board
The heart of your robot will be a Raspberry Pi single-board computer. We recommend using a Raspberry Pi 3 or 4 for optimal performance, but a Raspberry Pi Zero can work for simpler projects.
2. Robot Chassis
You’ll need a chassis to serve as the body and frame of your robot. There are many options available, from simple 2-wheel designs to more advanced 4-wheel or tracked platforms. Choose one that suits your project’s goals and complexity.
3. Motors and Wheels
To make your robot move, you’ll need DC motors and wheels that are compatible with your chosen chassis. The number of motors will depend on your chassis type (2 for 2-wheel, 4 for 4-wheel).
4. Motor Controller
A motor controller board is necessary to allow the Raspberry Pi to control the motors. The L298N dual H-bridge motor controller is a popular choice for driving two DC motors.
5. Battery Pack
Your robot will need a power source to run untethered. A rechargeable battery pack that provides 5V output to power the Raspberry Pi is ideal. The size will depend on your desired run time.
6. Breadboard and Jumper Wires
For prototyping and connecting components, you’ll need a breadboard and male-to-male (M2M) jumper wires.
7. Sensors (optional)
You can add various sensors to your robot for functions like obstacle avoidance, line following, distance measurement, etc. Popular options include ultrasonic distance sensors, infrared sensors, and line following sensors.
Here’s a summary table of the core components:
| Component | Description |
|---|---|
| Raspberry Pi Board | Raspberry Pi 3 or 4 recommended |
| Robot Chassis | 2-wheel, 4-wheel, or tracked platform |
| DC Motors | Match voltage and size to chassis |
| Wheels | Compatible with DC motors |
| L298N Motor Controller | Dual H-bridge for driving 2 DC motors |
| 5V Battery Pack | Rechargeable, size based on desired run time |
| Breadboard | For prototyping circuit connections |
| Jumper Wires | Male-to-male (M2M) for connections |
| Sensors (optional) | Ultrasonic, infrared, line sensors, etc. |
With these components gathered, we’re ready to start assembling our Raspberry Pi robot!

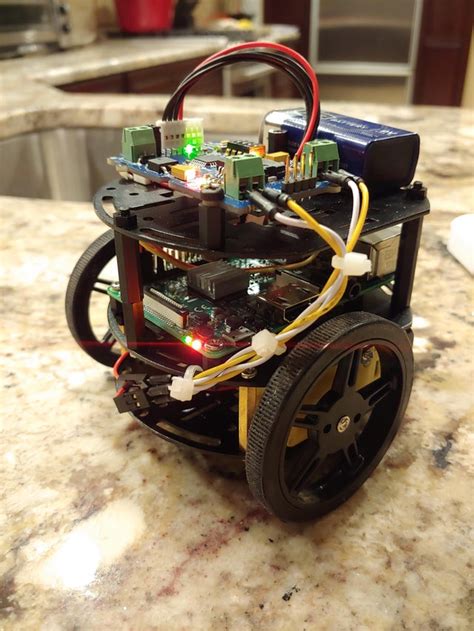
Assembling the Robot Chassis
The first step is putting together the body of your robot using the chassis kit. The exact assembly process will vary depending on the specific chassis you chose, but here’s a general overview:
-
Start by laying out all the chassis parts and hardware (screws, nuts, spacers, etc.) that came with your kit. Consult the kit’s assembly instructions or diagrams.
-
Identify the chassis plates that will form the base, upper deck, and motor mounts.
-
Attach the DC motors to the motor mounts using the provided screws. Make sure they are securely fastened.
-
Connect the wheels to the motor shafts. Many kits use set screws or push-on attachments to affix the wheels.
-
Join the motor mounts to the chassis base plate. The L298N motor controller will typically sit on top of this base plate.
-
Attach standoffs/spacers to the base plate to support the upper deck that will hold the Raspberry Pi and breadboard.
-
Secure the upper deck plate onto the standoffs.
-
Optionally attach a ball caster or fixed caster to the front or back of the chassis to act as a third point of contact and stability.
-
Route the motor wires up through holes in the chassis plates for connection to the L298N controller.
After assembly, your robot chassis should look something like this:
| Part | Location |
|---|---|
| DC Motors | Mounted on either side of base plate |
| Wheels | Attached to motor shafts |
| Base Plate | Bottom of chassis |
| Upper Deck Plate | Mounted above base plate on standoffs |
| Ball Caster | Front or rear of chassis for stability |
With the chassis assembled, we can move on to wiring up the electronics.

Wiring the Electronics
Now it’s time to connect the electronic components on the breadboard and wire them to the Raspberry Pi and chassis. Here’s a step-by-step guide:
-
Place the breadboard on the upper deck plate of the chassis. Secure it with tape or adhesive if necessary.
-
Insert the L298N motor controller into the breadboard, straddling the central divide. Make sure the pin labels are facing up.
-
Connect the positive and negative leads from the battery pack to the breadboard’s power rail. Red wire to positive (+), black wire to negative (-).
-
Use jumper wires to connect the battery pack’s positive (+) rail to the L298N’s VCC pin, and the negative (-) rail to one of the L298N’s GND pins.
-
Take the two pairs of motor wires (4 wires total) coming up from the chassis and connect them to the OUT1, OUT2, OUT3, OUT4 terminals of the L298N. Typically red to OUTx and black to OUTx, but verify with your specific motors.
-
Connect 4 jumper wires from the Raspberry Pi’s GPIO pins to the L298N’s control pins:
- GPIO 18 to IN1
- GPIO 23 to IN2
- GPIO 24 to IN3
-
GPIO 25 to IN4
-
Connect a jumper wire from any of the Raspberry Pi’s GND pins to the breadboard’s ground (-) rail.
-
If using sensors, refer to their wiring diagrams and connect them to the appropriate Raspberry Pi GPIO pins and power/ground rails on the breadboard.
Your wired breadboard should resemble this layout:
        [Battery Pack]
          (+)   (-)
           |     |
  (VCC)  [L298N]  (GND)
   |  |         |  |
 (IN1) (OUT1) (OUT2) (IN2)
   |     |      |    |
 (IN3) (OUT3) (OUT4) (IN4)
   |     |      |    |
   |     |      |    |
   |   [DC Motor 1]  |
   |                 |
   |   [DC Motor 2]  |
   |                 |
   |                 |
  (GND)           (GPIO)
    |               |
    |               |
   [Raspberry Pi GPIO Pins]
Double check all your connections to make sure they are secure and correct. With the wiring complete, we’re almost ready to bring our robot to life with code!

Programming the Robot
To control your Raspberry Pi robot, you’ll need to write a program that interfaces with the motor controller and any sensors you’ve connected. We’ll use Python for its simplicity and extensive libraries for GPIO control and robotics.
1. Setting Up the Raspberry Pi
First, make sure your Raspberry Pi is set up with the latest version of Raspbian OS and connected to the internet. Open a terminal and run the following commands to ensure everything is up to date:
sudo apt-get update
sudo apt-get upgrade
2. Enabling GPIO Access
To control the GPIO pins from Python, we need to install the RPi.GPIO library. Run this command:
sudo apt-get install python3-rpi.gpio
3. Writing the Python Code
Now we can write our Python script to control the robot’s motors. Here’s a basic example that drives the robot forward, backward, and spins in place:
import RPi.GPIO as GPIO
import time

# Set up GPIO pins
GPIO.setmode(GPIO.BCM)
GPIO.setup(18, GPIO.OUT)
GPIO.setup(23, GPIO.OUT)
GPIO.setup(24, GPIO.OUT)
GPIO.setup(25, GPIO.OUT)

# Define motor control functions
def forward():
    GPIO.output(18, GPIO.HIGH)
    GPIO.output(23, GPIO.LOW)
    GPIO.output(24, GPIO.HIGH)
    GPIO.output(25, GPIO.LOW)

def backward():
    GPIO.output(18, GPIO.LOW)
    GPIO.output(23, GPIO.HIGH)
    GPIO.output(24, GPIO.LOW)
    GPIO.output(25, GPIO.HIGH)

def left():
    GPIO.output(18, GPIO.LOW)
    GPIO.output(23, GPIO.HIGH)
    GPIO.output(24, GPIO.HIGH)
    GPIO.output(25, GPIO.LOW)

def right():
    GPIO.output(18, GPIO.HIGH)
    GPIO.output(23, GPIO.LOW)
    GPIO.output(24, GPIO.LOW)
    GPIO.output(25, GPIO.HIGH)

def stop():
    GPIO.output(18, GPIO.LOW)
    GPIO.output(23, GPIO.LOW)
    GPIO.output(24, GPIO.LOW)
    GPIO.output(25, GPIO.LOW)

# Main robot control loop
try:
    while True:
        forward()
        time.sleep(1)
        stop()
        time.sleep(0.5)
        backward()
        time.sleep(1)
        stop()
        time.sleep(0.5)
        left()
        time.sleep(0.5)
        right()
        time.sleep(0.5)
        stop()
        time.sleep(1)

except KeyboardInterrupt:
    stop()
    GPIO.cleanup()
This script defines functions for each direction (forward, backward, left, right) and a stop function. The try/except block runs the main control loop indefinitely until you press Ctrl+C to stop it.
You can save this code in a file named robot_control.py on your Raspberry Pi. To run it, open a terminal and type:
python3 robot_control.py
Your Raspberry Pi robot should now come to life and start moving according to the defined sequence! Feel free to modify the code to change the motion pattern, timing, or add in sensor-based behaviors.
With the basic programming in place, let’s explore some ways to expand your robot’s capabilities.
Enhancing Your Robot
There are countless ways to upgrade and customize your Raspberry Pi robot. Here are a few ideas to get you started:
Wireless Control
You can set up your robot to be controlled wirelessly over WiFi or Bluetooth. Some options include:
* Using a web-based interface to send commands to the robot
* Creating a mobile app with buttons to control the robot
* Connecting a wireless gamepad or joystick as an input device
Computer Vision
By adding a camera module to your Raspberry Pi, you can give your robot sight! Some cool computer vision projects:
* Object detection and tracking
* QR code or AR tag following
* Facial recognition
* Gesture-based control
Autonomous Navigation
To make your robot more independent, you can implement autonomous navigation algorithms. For example:
* Obstacle avoidance using ultrasonic or infrared sensors
* Line following using infrared reflectance sensors
* Room mapping and localization with SLAM techniques
* Path planning to navigate between waypoints
Voice Interaction
Incorporating voice control and audio feedback can make your robot feel more interactive and engaging. Consider adding:
* Voice commands using offline or cloud-based speech recognition
* Text-to-speech output for status updates or error messages
* Reactive beeps, boops, and sound effects
* Audio playback of music or recorded phrases
The possibilities are endless – it all depends on your imagination and the specific goals you have for your Raspberry Pi robot. Don’t be afraid to experiment, combine ideas, and see what you can create!
Conclusion
Congratulations on building your very own Raspberry Pi robot! You’ve gained hands-on experience with electronics, coding, and robotics concepts that will serve you well in future projects.
Remember, this guide provides a foundation to get you started, but the real fun begins when you start customizing and expanding your robot’s abilities. Keep learning, tinkering, and pushing the boundaries of what your robot can do.
Building a Raspberry Pi robot is an incredibly rewarding endeavor. Not only do you end up with a cool robotic companion, but you also develop valuable skills in problem-solving, creativity, and technical know-how.
So keep on hacking, making, and exploring the exciting world of Raspberry Pi robotics. We can’t wait to see what amazing bots you’ll build next!
Frequently Asked Questions
1. What programming languages can I use to control my Raspberry Pi robot?
Python is one of the most popular choices for Raspberry Pi Projects due to its beginner-friendliness and extensive libraries. However, you can also use other languages that support GPIO access, such as C/C++, Java, or Node.js.
2. Can I use different sized wheels or add more wheels to my chassis?
Absolutely! The chassis and wheel configuration is highly customizable. Just make sure your motors are rated for the size and weight of your wheels/chassis, and that you have the appropriate motor controller to handle the number of motors.
3. How long will my robot run on a single battery charge?
The run time depends on your battery capacity (in mAh), the current draw of your motors and electronics, and how hard you’re working your robot. To extend run time, choose high-capacity batteries and implement power-saving measures in your code.
4. Can I add more sensors to my robot beyond what was covered here?
Yes, you can integrate all sorts of sensors to enhance your robot’s capabilities. From environmental sensors like temperature and humidity to motion sensors and accelerometers, the Raspberry Pi has plenty of GPIO pins and supports a wide range of Sensor Types.
5. What if I run into issues or have questions during my build?
Don’t worry, troubleshooting is a natural part of the building process! There are many helpful resources available, including the official Raspberry Pi forums, robotics communities like Arduino and Adafruit, and online tutorials. When in doubt, search the web, consult documentation, and don’t be afraid to ask for help.
No responses yet