Table of Contents
- Introduction to PIR Sensors
- How PIR Sensors Work
- Types of PIR Sensors
- Applications of PIR Sensors
- Connecting a PIR Sensor to Arduino
- Arduino PIR Sensor Code Example
- Connecting a PIR Sensor to Raspberry Pi
- Raspberry Pi PIR Sensor Python Code Example
- Tips for Using PIR Sensors Effectively
- Frequently Asked Questions (FAQ)
- Conclusion
Introduction to PIR Sensors
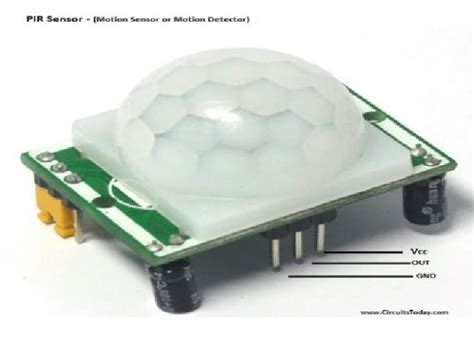
PIR sensors are small, inexpensive, low-power, easy to use, and don’t wear out. For those reasons, they are commonly found in appliances and gadgets used in homes or businesses. They are often referred to as “PIR”, “Pyroelectric”, “Passive Infrared”, “IR motion”, or “IR Sensor”.
PIRs are basically made of a pyroelectric sensor, which can detect levels of infrared radiation. Everything emits some low-level radiation, and the hotter something is, the more radiation it emits. The sensor in a motion detector is split into two halves. The reason for that is that we are looking to detect motion (change), not average IR levels. The two halves are wired up so that they cancel each other out. If one half sees more or less IR radiation than the other, the output will swing high or low.

How PIR Sensors Work
A PIR sensor consists of a fresnel lens, an infrared detector, and supporting electronics. The lens on the sensor focuses any infrared radiation present around it towards the infrared detector. Our bodies generate infrared heat, and as a result, this heat is picked up by the motion sensor. In order to make the sensor more efficient, the lens splits the viewing area into multiple sections.
As a warm body like a human or animal passes by, it first intercepts one half of the PIR sensor, which causes a positive differential change between the two halves. When the warm body leaves the sensing area, the reverse happens, whereby the sensor generates a negative differential change. These changes pulse are what is detected.

Types of PIR Sensors
There are several types of PIR sensors available on the market, each with its own unique features and specifications. Some of the most common types include:
-
Standard PIR Sensor: This is the most basic type of PIR sensor, which detects motion within its field of view and outputs a digital signal when triggered.
-
Dual Element PIR Sensor: This type of sensor has two sensing elements, which helps to reduce false triggering caused by changes in ambient temperature.
-
Ceiling Mount PIR Sensor: Designed for mounting on ceilings, these sensors have a wider field of view and are ideal for covering larger areas.
-
Wall Mount PIR Sensor: These sensors are designed for mounting on walls and have a more focused field of view, making them suitable for covering specific areas or entrances.
-
Outdoor PIR Sensor: These sensors are weatherproof and designed for outdoor use, with features like adjustable sensitivity and built-in light sensors.
| Sensor Type | Detection Range | Field of View | Application |
|---|---|---|---|
| Standard PIR | Up to 20 feet | 110° | Indoor motion detection |
| Dual Element PIR | Up to 30 feet | 110° | Indoor motion detection with reduced false triggers |
| Ceiling Mount PIR | Up to 30 feet | 360° | Large room or warehouse monitoring |
| Wall Mount PIR | Up to 30 feet | 180° | Hallway or entrance monitoring |
| Outdoor PIR | Up to 50 feet | 180° | Outdoor security and lighting control |

Applications of PIR Sensors
PIR sensors have a wide range of applications, including:
-
Security Systems: PIR sensors are commonly used in security systems to detect intruders and trigger alarms.
-
Automatic Lighting Control: PIR sensors can be used to automatically turn on lights when someone enters a room and turn them off when the room is unoccupied.
-
Energy Management: By using PIR sensors to detect occupancy, HVAC and lighting systems can be automatically controlled to save energy.
-
Automatic Doors: PIR sensors can be used to open and close doors automatically when someone approaches.
-
Robot Navigation: PIR sensors can be used in robotics to help robots navigate their environment and avoid obstacles.
Connecting a PIR Sensor to Arduino
To connect a PIR sensor to an Arduino, follow these steps:
- Connect the VCC pin of the PIR sensor to the 5V pin on the Arduino.
- Connect the GND pin of the PIR sensor to the GND pin on the Arduino.
- Connect the OUT pin of the PIR sensor to a digital input pin on the Arduino (e.g., pin 2).
Arduino PIR Sensor Code Example
Here’s a simple Arduino sketch that demonstrates how to use a PIR sensor to detect motion:
int pirPin = 2;  // PIR sensor connected to digital pin 2
int ledPin = 13; // LED connected to digital pin 13

void setup() {
  pinMode(pirPin, INPUT);
  pinMode(ledPin, OUTPUT);
  Serial.begin(9600);
}

void loop() {
  int pirState = digitalRead(pirPin);

  if (pirState == HIGH) {
    digitalWrite(ledPin, HIGH);
    Serial.println("Motion detected!");
  } else {
    digitalWrite(ledPin, LOW);
    Serial.println("No motion.");
  }

  delay(500);
}
Connecting a PIR Sensor to Raspberry Pi
To connect a PIR sensor to a Raspberry Pi, follow these steps:
- Connect the VCC pin of the PIR sensor to a 5V pin on the Raspberry Pi (e.g., pin 2).
- Connect the GND pin of the PIR sensor to a GND pin on the Raspberry Pi (e.g., pin 6).
- Connect the OUT pin of the PIR sensor to a GPIO pin on the Raspberry Pi (e.g., GPIO 4, which is pin 7).
Raspberry Pi PIR Sensor Python Code Example
Here’s a simple Python script that demonstrates how to use a PIR sensor with a Raspberry Pi:
import RPi.GPIO as GPIO
import time

pirPin = 4      # PIR sensor connected to GPIO 4
ledPin = 18     # LED connected to GPIO 18

GPIO.setmode(GPIO.BCM)
GPIO.setup(pirPin, GPIO.IN)
GPIO.setup(ledPin, GPIO.OUT)

while True:
    if GPIO.input(pirPin):
        print("Motion Detected!")
        GPIO.output(ledPin, GPIO.HIGH)
        time.sleep(1)
    else:
        print("No motion.")
        GPIO.output(ledPin, GPIO.LOW)
        time.sleep(1)
Tips for Using PIR Sensors Effectively
-
Adjust Sensitivity: Most PIR sensors have a sensitivity adjustment potentiometer. Turn it clockwise to increase sensitivity and counterclockwise to decrease it.
-
Avoid False Triggers: To minimize false triggers, place the sensor away from heat sources, direct sunlight, and moving objects like fans or curtains.
-
Consider Sensor Placement: Position the sensor so that it has a clear view of the area you want to monitor and is not obstructed by furniture or other objects.
-
Use a Delay: After a PIR sensor is triggered, it needs a few seconds to reset. Use a delay in your code to avoid multiple triggers during this reset period.
-
Combine with Other Sensors: For more robust motion detection, consider using PIR sensors in combination with other sensors like microwave or Ultrasonic Sensors.
Frequently Asked Questions (FAQ)
- What is the detection range of a typical PIR sensor?
-
Most PIR sensors have a detection range of up to 20-30 feet (6-10 meters). However, this can vary depending on the specific sensor and environmental conditions.
-
Can PIR sensors detect motion through walls?
-
No, PIR sensors cannot detect motion through walls, as infrared radiation does not pass through solid objects. They require a clear line of sight to detect motion.
-
How can I reduce false triggers from my PIR sensor?
-
To reduce false triggers, ensure the sensor is not pointed at heat sources, direct sunlight, or moving objects. Adjust the sensitivity if needed and consider using a delay in your code.
-
Can I use a PIR sensor outdoors?
-
Yes, there are PIR sensors specifically designed for outdoor use. These sensors are typically weatherproof and have features like adjustable sensitivity and built-in light sensors.
-
How do I choose the right PIR sensor for my project?
- When choosing a PIR sensor, consider factors such as detection range, field of view, power requirements, and whether the sensor will be used indoors or outdoors. Consult the sensor’s datasheet and compare different models to find the best fit for your project.
Conclusion
PIR sensors are versatile and easy-to-use devices that have numerous applications in home automation, security systems, energy management, and robotics. By understanding how PIR sensors work and following best practices for their use, you can effectively incorporate them into your projects.
This guide has provided an overview of PIR sensors, their types, and applications, as well as code examples for using them with Arduino and Raspberry Pi. With this knowledge, you should be well-equipped to start exploring the possibilities of PIR sensors in your own projects.
No responses yet