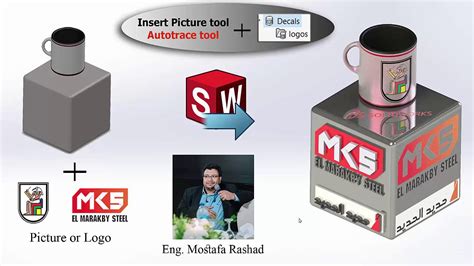
Understanding Decals in SolidWorks
Before we dive into the techniques for improving decal quality, let’s first understand what decals are and how they work in SolidWorks. Decals are essentially 2D images that can be applied to the surface of a 3D model. They can be used to add visual interest, convey information, or simulate the appearance of real-world materials such as wood, metal, or fabric.
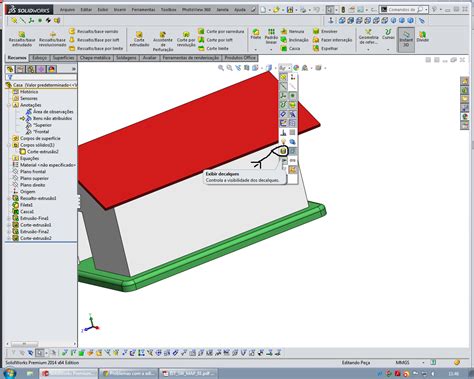
In SolidWorks, decals are created using the Decal feature, which can be found in the Insert menu. To create a decal, you first need to have an image file in a supported format such as BMP, JPG, PNG, or TIF. You can then select the face of the model where you want to apply the decal, and use the Decal PropertyManager to adjust the size, position, and orientation of the decal.
Factors Affecting Decal Quality
There are several factors that can affect the quality of decals in SolidWorks, including:
-
Image resolution: The resolution of the image file used for the decal can have a significant impact on the quality of the final result. Low-resolution images may appear pixelated or blurry when applied to the model.
-
Decal size: The size of the decal relative to the model can also affect its quality. If the decal is too small, it may be difficult to see the details, while if it is too large, it may appear stretched or distorted.
-
Surface curvature: The curvature of the surface where the decal is applied can also affect its appearance. Decals applied to highly curved surfaces may appear distorted or stretched, especially if the image is not designed to conform to the surface.
-
Lighting and rendering settings: The lighting and rendering settings used in SolidWorks can also impact the appearance of decals. Poorly lit or rendered models may make the decals appear dull or washed out.
Techniques for Improving Decal Quality
Now that we understand the factors that can affect decal quality, let’s explore some techniques for improving it.
Use High-Resolution Images
One of the most important things you can do to improve decal quality is to use high-resolution images. The higher the resolution of the image, the more detail it will contain, and the better it will look when applied to the model. As a general rule, you should aim for an image resolution of at least 300 dpi (dots per inch) for best results.
If you are creating your own images for decals, you can use image editing software such as Adobe Photoshop or GIMP to ensure that they are saved at a high resolution. If you are using existing images, you may need to search for higher-resolution versions or use image upscaling techniques to increase their resolution.
Adjust Decal Size and Position
Another way to improve decal quality is to carefully adjust their size and position on the model. As mentioned earlier, decals that are too small or too large can appear distorted or pixelated. To avoid this, you should try to match the size of the decal to the size of the surface where it will be applied.
You can use the Decal PropertyManager in SolidWorks to adjust the size and position of the decal. You can also use the Move Face and Rotate Face commands to fine-tune the placement of the decal on the surface.
Use Decal Mapping Techniques
For decals that need to be applied to highly curved or complex surfaces, you may need to use decal mapping techniques to ensure a good fit. Decal mapping involves creating a 2D projection of the 3D surface where the decal will be applied, and then using that projection to create a custom image that will conform to the surface.
There are several ways to create decal maps in SolidWorks, including:
-
Using the Decal Mapping tool: The Decal Mapping tool in SolidWorks allows you to create a decal map by selecting the faces of the model where the decal will be applied, and then generating a flattened 2D view of those faces. You can then use that view to create a custom image that will fit the surface perfectly.
-
Using the Wrap Sketch tool: The Wrap Sketch tool allows you to create a sketch on a 3D surface, and then use that sketch to define the boundaries of the decal. This can be useful for creating decals that need to follow the contours of the surface closely.
-
Using the 3D Texture Mapping tool: The 3D Texture Mapping tool allows you to apply a 2D image to a 3D surface using a set of mapping coordinates. This can be useful for creating more complex decals that need to wrap around multiple surfaces.
Optimize Lighting and Rendering Settings
Finally, to ensure that your decals look their best, you should optimize the lighting and rendering settings in SolidWorks. Good lighting can help to highlight the details and textures of the decal, while poor lighting can make it appear flat and lifeless.
To optimize the lighting in SolidWorks, you can use the Lights tool to add and adjust lighting sources in the scene. You can also use the RealView graphics mode to see a more realistic preview of the model with the decals applied.
When it comes to rendering, you should use high-quality settings to ensure that the decals are rendered with maximum detail and clarity. This may include adjusting the resolution, anti-aliasing, and texture quality settings in the Render PropertyManager.

SolidWorks Decal Quality FAQs
-
What is the best image format to use for decals in SolidWorks?
The best image formats to use for decals in SolidWorks are PNG and TIF, as they support transparency and high resolution. JPEG can also be used, but may result in lower quality due to compression. -
Can I use vector graphics for decals in SolidWorks?
Yes, you can use vector graphics such as AI or EPS files for decals in SolidWorks, but you will need to convert them to a raster format such as PNG or TIF before applying them to the model. -
How can I avoid distortion when applying decals to curved surfaces?
To avoid distortion when applying decals to curved surfaces, you can use decal mapping techniques such as the Decal Mapping tool, Wrap Sketch tool, or 3D Texture Mapping tool in SolidWorks. These tools allow you to create custom images that conform to the shape of the surface. -
Can I apply decals to multiple faces of a model at once?
Yes, you can apply decals to multiple faces of a model at once using the Decal PropertyManager in SolidWorks. Simply select all the faces where you want to apply the decal, and then adjust the size and position of the decal as needed. -
What can I do if my decals appear blurry or pixelated?
If your decals appear blurry or pixelated, the most likely cause is low image resolution. To fix this, you should use higher-resolution images for your decals, with a minimum resolution of 300 dpi. You can also try adjusting the size of the decal to better match the size of the surface where it will be applied.
Conclusion
Adding decals to your SolidWorks models can be a great way to add visual interest and convey important information. However, to ensure that your decals look their best, you need to pay attention to factors such as image resolution, decal size and position, surface curvature, and lighting and rendering settings.
By using high-resolution images, carefully adjusting the size and position of your decals, using decal mapping techniques for complex surfaces, and optimizing your lighting and rendering settings, you can create high-quality decals that enhance the overall appearance of your SolidWorks models.
| Technique | Description |
|---|---|
| Use high-resolution images | Use images with a minimum resolution of 300 dpi for best results |
| Adjust decal size and position | Match the size of the decal to the size of the surface where it will be applied, and use the Decal PropertyManager to fine-tune the position |
| Use decal mapping techniques | Use tools such as Decal Mapping, Wrap Sketch, or 3D Texture Mapping to create custom images that conform to complex surfaces |
| Optimize lighting and rendering settings | Use the Lights tool to add and adjust lighting sources, and use high-quality rendering settings to ensure maximum detail and clarity |
By following these techniques and best practices, you can create stunning decals that take your SolidWorks models to the next level. Whether you are creating product visualizations, marketing materials, or technical drawings, high-quality decals can help to convey your message and capture your audience’s attention.
No responses yet