
Introduction to TAMIYA ESC
TAMIYA is a well-known brand in the world of RC (Radio Controlled) cars and accessories. One of their popular products is the Electronic Speed Controller (ESC), which is an essential component in controlling the speed and direction of the RC car’s motor. Setting up a TAMIYA ESC may seem daunting for beginners, but with the right guidance and tools, it can be a straightforward process. In this article, we will walk you through the 10 steps to set up a TAMIYA ESC, ensuring that your RC car is ready to hit the tracks in no time.
What You Need
Before we dive into the step-by-step process, let’s take a look at the items you’ll need to set up your TAMIYA ESC:
| Item | Description |
|---|---|
| TAMIYA ESC | The Electronic Speed Controller specific to TAMIYA RC cars |
| TAMIYA Motor | A compatible motor for your TAMIYA RC car |
| TAMIYA Battery Pack | A suitable battery pack to power your ESC and motor |
| TAMIYA Connector Set | Includes the necessary connectors for wiring |
| Soldering Iron and Solder | For soldering connections |
| Heat Shrink Tubing | To protect and insulate soldered connections |
| Scissors or Wire Cutters | For cutting wires and heat shrink tubing |
| Phillips Screwdriver | For securing the ESC to the chassis |
| Double-Sided Tape or Velcro | For additional mounting options |
Step 1: Understand Your TAMIYA ESC
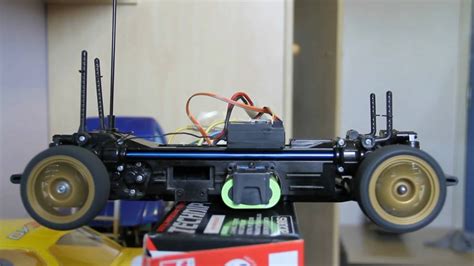
Before you start the setup process, it’s essential to familiarize yourself with your TAMIYA ESC. Take a look at the ESC and identify the following components:
- Power Input Wires (Red and Black)
- Motor Output Wires (Blue, Yellow, Orange)
- Receiver Input Wire (Three-wire cable)
- Switch (On/Off)
- LED Indicator
- Heat Sink (if applicable)
Understanding the layout and functions of these components will make the setup process much easier.

Step 2: Connect the Motor to the ESC
The first step in setting up your TAMIYA ESC is to connect it to the motor. Follow these sub-steps:
- Identify the three motor output wires on the ESC (Blue, Yellow, Orange).
- Connect each wire to the corresponding tab on the motor. The order of the wires may vary depending on your specific ESC and motor, so refer to the user manual for the correct configuration.
- If necessary, solder the connections and cover them with heat shrink tubing for added protection and insulation.

Step 3: Connect the Battery Pack to the ESC
Next, you’ll need to connect the battery pack to the ESC. Here’s how:
- Identify the power input wires on the ESC (Red and Black).
- Connect the red wire to the positive (+) terminal of the battery pack and the black wire to the negative (-) terminal.
- If your battery pack has a different connector than the ESC, you may need to use the TAMIYA Connector Set to create an adapter.
- Ensure that the connections are secure and properly insulated.
Step 4: Connect the ESC to the Receiver
To allow the ESC to communicate with the radio transmitter, you must connect it to the receiver. Follow these steps:
- Locate the receiver input wire on the ESC (usually a three-wire cable).
- Connect this wire to the throttle channel on your receiver. The throttle channel is typically labeled as “THR” or “CH2”.
- Pay attention to the polarity of the connection. The signal wire (usually white or yellow) should be connected to the signal pin on the receiver, while the positive (red) and negative (black) wires should be connected to the corresponding pins on the receiver.
Step 5: Mount the ESC to the Chassis
With all the necessary connections made, it’s time to mount the ESC to the chassis of your RC car. Here are some options:
- Use the included double-sided tape or Velcro to secure the ESC to a flat surface on the chassis.
- If your ESC has mounting holes, use the appropriate screws and spacers to attach it to the designated location on the chassis.
- Ensure that the ESC is positioned away from moving parts and has sufficient airflow for cooling.
Step 6: Calibrate the ESC
Before you can use your TAMIYA ESC, you need to calibrate it to ensure that it responds correctly to the throttle input from the transmitter. The calibration process may vary slightly depending on your specific ESC model, but the general steps are as follows:
- Turn on the transmitter and set the throttle trim and throttle stick to their neutral positions.
- Connect the battery pack to the ESC and turn it on.
- Press and hold the setup button on the ESC until the LED starts flashing.
- Follow the specific instructions for your ESC to set the neutral, full throttle, and full brake positions. This usually involves moving the throttle stick to the desired position and pressing the setup button to confirm each setting.
- Once the calibration is complete, the ESC should emit a confirmation tone, and the LED should stop flashing.
Step 7: Set the ESC Parameters (Optional)
Some TAMIYA ESCs allow you to customize various parameters to suit your driving style and preferences. These parameters may include:
- Brake Strength
- Punch (Acceleration)
- Timing
- Battery Type (LiPo or NiMH)
To set these parameters, refer to your ESC’s user manual for the specific programming procedure. Usually, this involves pressing the setup button a certain number of times to access the desired parameter and then using the throttle stick to adjust the value.
Step 8: Test the Setup
With the ESC calibrated and mounted, it’s time to test your setup. Follow these steps:
- Ensure that the ESC is turned off and the battery pack is disconnected.
- Turn on the transmitter and set the throttle stick to the neutral position.
- Connect the battery pack to the ESC and turn it on.
- Gradually move the throttle stick forward to test the forward motion of the motor. The motor should spin smoothly and increase in speed as you move the throttle stick further.
- Move the throttle stick backward to test the brake and reverse functions (if applicable).
- If everything is working correctly, your TAMIYA ESC setup is complete!
Step 9: Secure the Wiring
To ensure that your wiring stays in place and doesn’t interfere with the moving parts of your RC car, it’s essential to secure it properly. Here are some tips:
- Use zip ties or cable ties to bundle the wires together and attach them to the chassis.
- Keep the wires away from the moving parts, such as the gears, axles, and suspension components.
- If necessary, use additional heat shrink tubing or electrical tape to protect the wires from abrasion and short circuits.
Step 10: Enjoy Your TAMIYA RC Car!
Congratulations! You have successfully set up your TAMIYA ESC, and your RC car is ready to hit the tracks. Remember to always follow proper safety guidelines and maintain your ESC and other components for optimal performance and longevity.
Frequently Asked Questions (FAQ)
- Can I use any motor with my TAMIYA ESC?
-
No, you should use a motor that is compatible with your specific ESC model. Refer to the ESC’s user manual or TAMIYA’s website for a list of compatible motors.
-
How do I know if my ESC is compatible with my battery pack?
-
Check the specifications of your ESC and battery pack. The ESC should support the voltage and discharge rate of the battery pack. For example, if you have a 7.4V LiPo battery, ensure that your ESC is designed to work with 2S LiPo batteries.
-
What should I do if my ESC doesn’t seem to respond to the throttle input?
-
First, ensure that all the connections are secure and properly plugged in. Then, try recalibrating the ESC. If the issue persists, check the user manual for troubleshooting steps or contact TAMIYA customer support for assistance.
-
Can I use a TAMIYA ESC with a non-TAMIYA RC car?
-
While it is possible to use a TAMIYA ESC with other brands of RC cars, it’s recommended to use ESCs and components that are specifically designed for your RC car to ensure optimal performance and compatibility.
-
How do I maintain my TAMIYA ESC?
- Keep the ESC clean and free from dust and debris. Regularly inspect the wiring and connections for any signs of wear or damage. Avoid exposing the ESC to extreme temperatures or moisture. If you notice any issues with the ESC’s performance, consult the user manual or contact TAMIYA customer support for guidance.
Conclusion
Setting up a TAMIYA Electronic Speed Controller may seem like a complex task, but by following these 10 steps and understanding the components and their functions, you can easily get your TAMIYA RC car up and running. Always prioritize safety and refer to the user manual for specific instructions related to your ESC model. With proper setup and maintenance, your TAMIYA ESC will provide reliable and efficient power control for your RC car, allowing you to enjoy exciting races and adventures on the tracks.
No responses yet